Connect with us

Fashion

Flat Piercing Guide: Pain, Healing, Aftercare & Jewelry

Published

on

Flat Piercing

Flat piercings are becoming increasingly popular as a unique way to express personal style. If you’re considering this trendy body modification, you’re probably filled with questions about the process, healing time, and how to care for your new jewelry. From understanding what exactly constitutes a flat piercing to exploring its potential downsides, we’ve got all the information you need. Whether you’re a seasoned piercer or thinking of getting one for the first time, dive into our comprehensive guide on flat piercing care and maintenance. Prepare yourself for everything from pain levels to aftercare tips that will keep your new accessory looking fabulous!

What Exactly Is a Flat Piercing?

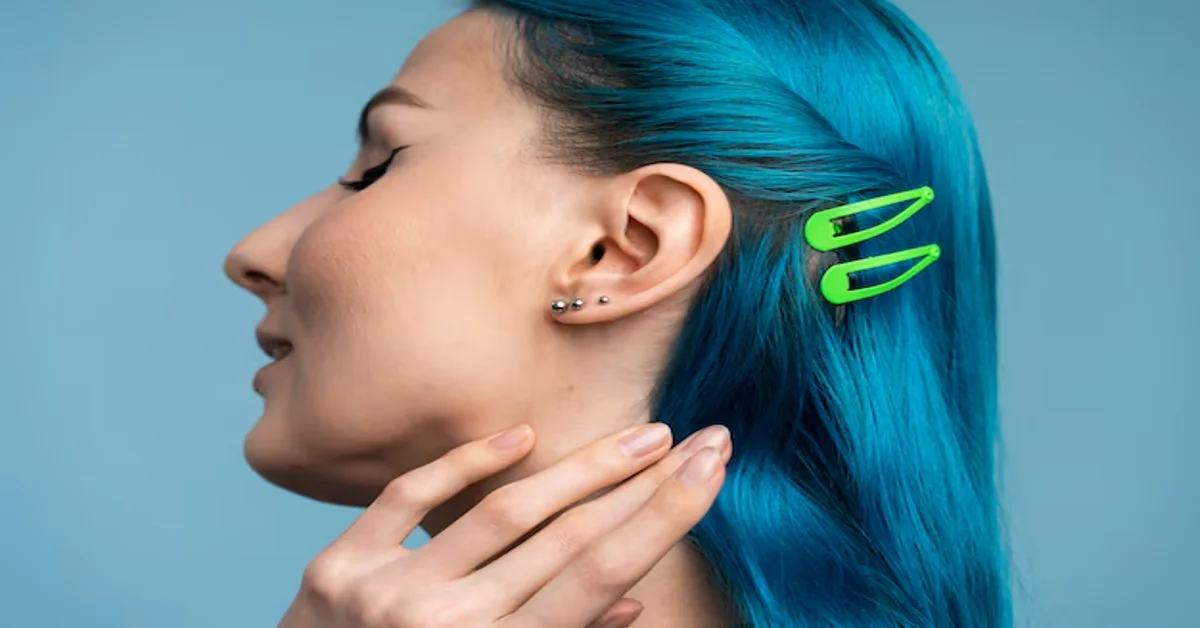
A flat piercing is a type of body modification that involves creating a hole in the cartilage or skin above the ear. Unlike traditional lobe piercings, which are located at the bottom of the ear, flat piercings sit more horizontally and can vary in placement depending on individual preference. This unique positioning allows for creative jewelry options and adds an edgy flair to your overall look.

Flat piercings are often chosen for their aesthetic appeal and versatility. They provide a canvas for various types of jewelry, including studs, hoops, or even decorative plates. The healing process can be different from standard earlobe piercings due to the tougher tissue involved, making aftercare essential.

Another interesting aspect of flat piercings is how they can be combined with other ear modifications. Many people opt for multiple placements along the upper ear area to create stunning visual patterns or themes. This layering effect enhances personal style while giving each piece its moment to shine.

In terms of popularity, flat piercings have surged as part of broader trends in body art and self-expression. They invite creativity while offering a fresh take on classic ear adornments.

How Painful Is a Flat Piercing?

Pain is subjective, and everyone’s tolerance levels vary. When it comes to a flat piercing, the sensation can range from mild discomfort to a sharper sting. The location of the piercing plays a significant role in how much pain you might experience. Flat piercings are typically done on the upper ear cartilage, which is known to be more sensitive than softer skin areas.

The initial poke of the needle can feel like a quick pinch or zap. Many people describe it as being similar to getting your ears pierced for the first time. After that sharp moment passes, some may notice an aching feeling that lingers briefly but usually subsides quickly.

It’s important to remember that any pain felt during the process is temporary. Once it’s done, most wearers report only minor soreness for a few days afterward while their body begins to heal around the new jewelry.

For those who have had other cartilage piercings before, such as helix or tragus piercings, they often find flat piercings bearable in comparison due to individual experiences with pain thresholds and healing processes.

How Long Does a Flat Piercing Take To Heal?

Healing time for a flat piercing typically ranges from 2 to 12 months. Several factors influence this duration, including your overall health, aftercare routine, and the body’s natural healing abilities. Each individual is unique, so listen to your body as it adjusts.

During the initial weeks post-piercing, you might experience redness or slight swelling. This is perfectly normal and part of the healing process. However, if irritation persists beyond a few weeks or worsens significantly, it’s essential to consult with a professional piercer or healthcare provider.

To promote faster healing, keep the area clean and free from irritants. Avoid touching your piercing unnecessarily and always wash your hands before doing any maintenance work on it. Regular cleaning with saline solution can help maintain hygiene without causing excess trauma.

Remember that everyone’s journey is different; some may heal quicker than others. Being patient is key when caring for a flat piercing and allowing it sufficient time to fully settle in place will pay off in long-term comfort and aesthetics.

Flat Piercing Aftercare

Proper aftercare is vital for the success of your flat piercing. First and foremost, keep the area clean. Use a saline solution or a gentle sea salt mix to rinse around the piercing twice daily. Avoid using alcohol or hydrogen peroxide, as these can irritate the skin and slow healing.

Avoid touching your new piercing with unwashed hands. This minimizes the risk of introducing bacteria that can lead to infection. If you do need to touch it – perhaps during cleaning or jewelry changes – make sure to sanitize your hands thoroughly first.

Sleeping on a fresh flat piercing can be uncomfortable and may cause irritation. Consider investing in a travel pillow or sleeping on your back until it’s fully healed. Soft pillows will also help minimize pressure on your ear while you rest.

Avoid swimming in pools, hot tubs, or natural bodies of water until you’re completely healed. These environments expose your piercing to germs that could hinder healing time and increase discomfort.

What Jewelry Should I Wear In My Flat Piercing?

Choosing the right jewelry for your flat piercing is essential for both comfort and style. Initially, opt for high-quality materials like titanium, surgical steel, or gold. These are hypoallergenic and reduce the chances of irritation during the healing process.

When selecting a piece, consider using a flat-back stud or a labret earring. These designs minimize pressure against your skin and help prevent bumps. The flatter base rests comfortably against the ear, which can be beneficial while sleeping or wearing headphones.

As you progress in your healing journey, you may explore various styles—such as gemstone-studded pieces or unique shapes. Just ensure that any added decorative elements won’t irritate your piercing site while it’s still sensitive.

Keep in mind that size matters too. Avoid overly large pieces initially; they can catch on clothing or hair and lead to discomfort or injury. Choose jewelry that complements your personal aesthetic but prioritizes safety first during those crucial initial weeks of healing.

Why Shouldn’t I Get a Flat Piercing?

Flat piercings might look stunning, but they aren’t for everyone. One significant consideration is the risk of complications during healing. The flat area on your ear can be sensitive and prone to irritation, especially from friction caused by hats or headphones.

Another concern is the potential for keloids, which are raised scars that can form at the piercing site. If you’re predisposed to keloid formation or have a history of skin issues, this could lead to an unsightly result.

Also worth noting is that flat piercings may not age well. As you grow older, your skin loses elasticity and fat; this change can affect how jewelry sits in a flat piercing over time. What looks great today might start to sag or become uncomfortable later on.

Consider lifestyle factors like active sports or rigorous workouts. Flat piercings require more care and attention than other types due to their placement and sensitivity. If you’re often on the go or enjoy high-impact activities, it’s crucial to weigh these factors before making your decision.

How Much Does a Flat Piercing Cost?

The cost of a flat piercing can vary significantly based on several factors. Typically, you can expect to pay anywhere from $40 to $80 for the procedure itself. This price often includes the jewelry and aftercare information provided by the piercer.

Location plays a crucial role in pricing. If you’re in a big city or trendy area, fees may be higher due to increased demand and operating costs. On the other hand, smaller towns might offer more affordable options without compromising safety or quality.

Additionally, experience matters when it comes to your chosen professional. A seasoned piercer with an excellent reputation may charge more than someone who is just starting out. Remember that investing in expertise ensures better results and safer practices.

Don’t forget about potential follow-up expenses. You might need specialized cleaning solutions or jewelry changes during healing. Always factor these into your budget as they contribute to maintaining healthy flat piercings long-term.

Different Types of Flat Piercings

Flat piercings are a versatile and stylish choice for body art enthusiasts. They can be done on various parts of the ear, typically positioned on the flat area above the ear canal. This placement allows for creativity in jewelry selection and styling.

Some popular types include the helix piercing, which is located along the upper rim; anti-helix piercings that sit below it; and snug piercings that go through cartilage closer to the back of your ear. The forward helix piercing occupies a spot at the front part of your ear’s outer rim, while tragus piercings offer a unique look by puncturing through a small flap of cartilage near your face.

Moreover, you might consider getting multiple flat piercings on one or both ears for an edgy stacked effect. Each type adds uniqueness to your overall aesthetic while allowing you to personalize with different styles of jewelry.

With so many possibilities available, choosing a flat piercing can enhance not only your appearance but also give you room for self-expression as trends evolve over time. Always remember to consult with professional piercers who understand anatomy well, ensuring safety and optimal healing throughout this exciting journey into body modification!

Continue Reading
Click to comment

Leave a Reply

Your email address will not be published. Required fields are marked *

Fashion

Layered Haircuts: The Guide to Volume, Movement & Style

Published

on

Layered Haircuts

Layered haircuts have stood the test of time—and for good reason. Whether you’re going for bouncy volume, easy movement, or a fresh new look, layers can do it all. From sleek and subtle to bold and edgy, layered haircuts offer endless ways to express your personal style while enhancing your natural texture.

This guide will walk you through everything you need to know—from how to choose the best layers for your hair type and face shape to expert styling tips for everyday flair.

What Are Layered Haircuts?

Layered haircuts involve cutting hair at varying lengths to create a series of “layers” that fall over each other. This technique helps reduce bulk, enhance natural texture, and add movement to otherwise lifeless hair.

Unlike blunt cuts that fall evenly, layered cuts allow sections of hair to frame the face, create shape, and balance proportions. Layers can be long and subtle or short and choppy, depending on your desired look.

Benefits of Layered Haircuts

Wondering what makes layered haircuts such a universally loved style? Here’s why they work so well:

  • Adds volume to fine or flat hair
  • Removes weight from thick, heavy strands
  • Creates movement and bounce
  • Shapes the face and enhances features
  • Versatile styling—from ponytails to curls
  • Works for all hair types and textures

Whether you’re trying to grow your hair out or bring life to a shorter cut, layers offer a practical and stylish solution.

Best Layered Haircuts by Hair Length

Short Layered Haircuts

Short layers are ideal for pixie cuts or bob hairstyles. They help create shape and dimension, especially around the crown or jawline.

Popular styles:

  • Textured pixie
  • Stacked bob
  • Shaggy crop

Medium Layered Haircuts

Medium-length layered cuts are easy to maintain and style. They’re great for people who want volume without losing too much length.

Popular styles:

  • Shoulder-length shag
  • Layered lob (long bob)
  • Feathered mid-length cut

Long Layered Haircuts

Long hair can sometimes fall flat without structure. Layers give it life by breaking up the heaviness and adding texture.

Popular styles:

  • V-cut layers
  • Long layers with curtain bangs
  • U-shaped layered cuts

Choosing Layers Based on Face Shape

Choosing the right type of layers can complement and enhance your face shape dramatically.

Face ShapeBest Layer Type
RoundLong face-framing layers to elongate
OvalAlmost all layer styles work well
SquareSoft layers that begin below the jawline
HeartChin-length layers to balance wider forehead
DiamondShoulder-grazing layers with side parts
Long/OblongFull layers starting from cheekbones or chin

A skilled hairstylist will assess your facial features and personalize the layers to suit your aesthetic and facial proportions.

Layered Haircuts for Different Hair Types

Straight Hair

Straight hair benefits from layers because they add movement without curl. Soft layers give it dimension while avoiding a flat look.

Best style: Long layers or blunt cuts with soft layering at the bottom

Wavy Hair

Layers can enhance your natural wave and prevent your hair from looking too triangular or heavy at the ends.

Best style: Shaggy or choppy layers, beachy texture with volume

Curly Hair

With curly hair, layering must be done carefully to maintain shape and bounce. Too many layers can lead to frizz, while the right amount adds definition.

Best style: Deva cut or curly shag, cut when dry for precision

Thick vs. Fine Hair

  • Thick hair: Benefit from debulking layers that remove weight
  • Fine hair: Needs soft, minimal layering to avoid looking sparse

Top Trending Layered Haircut Styles

Staying on trend? Here are the most stylish layered cuts making waves:

1. The Butterfly Haircut

A dramatic, voluminous layered cut with face-framing bangs and layers that “float” like wings.

2. 70s Shag

A retro revival featuring tons of texture, curtain bangs, and a rocker-chic vibe.

3. Wolf Cut

This Gen Z favorite is a mix between the shag and mullet—messy, edgy, and full of personality.

4. Layered Bob with Bangs

Ideal for short to medium-length hair, this combo gives structure while still keeping it soft.

5. Face-Framing Layers

Popular with long hairstyles and perfect for highlighting cheekbones and softening the jawline.

Styling Tips for Maintaining Layered Hair

Want your layers to always look on point? Try these expert-approved tips:

  • Use a volumizing mousse or texturizing spray at the roots
  • Blow-dry with a round brush for bouncy volume
  • Use curling irons or straighteners to define layers
  • Regular trims every 6–8 weeks to maintain shape
  • Deep condition once a week to keep ends healthy
  • Dry shampoo helps keep layers fresh between washes

Common Mistakes to Avoid with Layered Haircuts

Even a trendy haircut can fall flat if not maintained properly. Watch out for these common pitfalls:

  • Too many short layers in thick or curly hair
  • Improper blending leading to choppy or uneven sections
  • Not styling regularly, which can make layers look messy
  • Using the wrong products for your hair type
  • Skipping trims, causing split ends to travel up the layers

Working with a professional stylist is the best way to avoid these issues and get the most out of your cut.

Conclusion: Is a Layered Haircut Right for You?

If you’re ready to refresh your hairstyle with something dynamic, easy to maintain, and endlessly customizable, then layered haircuts are a top-tier option. From enhancing your natural texture to giving fine hair the illusion of volume, layers are a timeless choice for anyone looking to elevate their style.

Don’t be afraid to experiment—layers are as unique as you are.

Frequently Asked Questions

1. Are layered haircuts good for thin hair?

Yes! Light layers can add volume and movement to thin hair without making it look sparse.

2. How often should I get my layers trimmed?

For best results, trim every 6–8 weeks to maintain shape and prevent split ends.

3. Can layered haircuts work with bangs?

Absolutely. Curtain bangs, wispy bangs, and blunt fringe all pair beautifully with layered styles.

4. What’s the difference between step cut and layered cut?

A step cut has more defined levels, while a layered cut has a more blended and gradual effect.

5. Will layers make my hair look thinner?

When done incorrectly, yes. But the right type of layering can add volume and texture without thinning the look.

Call to Action

Loved these layered haircut ideas?
Share this article, save it for your next salon visit, or subscribe to our newsletter for more expert hair advice, trends, and tutorials!

Continue Reading

Fashion

Best Pixie Haircuts for a Bold New Look For You in 2025

Published

on

Pixie Haircuts

Thinking about going short and bold? A pixie haircut could be exactly what you’re looking for. Known for its chic, low-maintenance appeal, pixie cuts are redefining beauty standards in 2025. This complete guide will help you understand everything about pixie haircuts, from choosing the right style to maintaining your new look with confidence.

What Are Pixie Haircuts?

Pixie haircuts are short hairstyles that typically cut the hair short on the back and sides while leaving slightly longer layers on top. The result is a flattering, edgy look that’s versatile and timeless.

Common features include:

  • Cropped sides
  • Layered or textured top
  • Optional bangs or fringe

Originally made popular in the 1950s and ’60s, pixie cuts have evolved into modern variations that suit nearly every personality and aesthetic.

Why Pixie Haircuts Are Trending in 2025

In 2025, we’re seeing a cultural shift toward bold self-expression and sustainable beauty. Pixie cuts fit perfectly into this narrative. Here’s why:

  • Minimal styling products = eco-friendly
  • Low maintenance in a fast-paced world
  • Empowering look that celebrates individuality
  • Ideal for warmer climates and active lifestyles

Social media has also played a role. Platforms like TikTok and Instagram are filled with transformation videos showcasing stunning pixie cut reveals—boosting the style’s popularity among Gen Z and millennials alike.

Benefits of a Pixie Cut

Choosing a pixie haircut has many benefits:

1. Low Maintenance

No more hour-long blowouts. Most pixie cuts dry quickly and require minimal product.

2. Versatility

Despite being short, pixie haircuts offer room for personalization:

  • Asymmetrical pixies
  • Pixie bobs
  • Undercuts

3. Highlights Facial Features

A pixie frames your face beautifully, drawing attention to your cheekbones, eyes, and jawline.

4. Cool and Comfortable

Perfect for summer or tropical climates.

5. Symbol of Confidence

Going short can be a bold move. It sends a message of strength, confidence, and self-assurance.

Types of Pixie Haircuts

There’s a pixie style for every vibe. Let’s break them down:

1. Classic Pixie

Short back and sides with uniform length on top.

2. Pixie Bob

A longer pixie that flirts with bob territory—great for those easing into short hair.

3. Textured Pixie

Choppy layers add volume and edge. Perfect for fine hair.

4. Asymmetrical Pixie

One side is longer than the other for a bold, fashion-forward look.

5. Undercut Pixie

Sides are shaved or buzzed while the top remains long.

6. Curly Pixie

Tailored for natural curls or perms. Embraces volume and bounce.

7. Long Pixie with Bangs

Perfect for softening the face while maintaining short length.

How to Choose the Best Pixie Haircut for Your Face Shape

Matching your haircut to your face shape makes a huge difference. Here’s a quick guide:

1. Oval Face

Almost any pixie style suits an oval face. Try a textured pixie or asymmetrical cut.

2. Round Face

Opt for volume at the crown and longer side-swept bangs to elongate the face.

3. Square Face

Soften angles with feathered layers and wispy bangs.

4. Heart-Shaped Face

Balance a wider forehead with side bangs and volume at the nape.

5. Long Face

Choose a fuller, tousled pixie with horizontal volume.

Maintenance Tips and Styling Advice

Though easy to maintain, pixie haircuts still need care:

  • Trims every 4-6 weeks to keep the shape
  • Use texturizing spray or pomade to style
  • Dry shampoo helps add lift and freshness
  • Silk pillowcase to reduce friction and maintain style

Quick Styling Tips:

  • For volume: blow-dry with a round brush
  • For edgy texture: apply wax and tousle
  • For sleek look: use a flat iron and smoothing cream

Celebrity Inspiration: Iconic Pixie Haircuts

Pixie haircuts have graced many famous faces. Here are a few inspiring celebs:

  • Halle Berry – Known for her signature choppy pixie
  • Zoë Kravitz – Elegant, minimalist short pixie
  • Emma Watson – Chic and classy cut during her post-Harry Potter era
  • Charlize Theron – Sleek, side-parted pixie for the red carpet
  • Rihanna – Edgy undercut pixie with attitude

These stars show how versatile and empowering pixie haircuts can be.

Conclusion: Is a Pixie Cut Right for You?

The beauty of pixie haircuts lies in their ability to reflect individuality. Whether you’re after a low-maintenance lifestyle, a bold new look, or a stylish reinvention, there’s a pixie cut that’s perfect for you.

Ready to make the cut? Talk to your stylist, show them inspiration pics, and embrace the freedom of short hair. You might just fall in love with your new look.

FAQs

Do pixie cuts suit everyone?

With the right cut for your face shape and hair texture, almost anyone can rock a pixie.

How often should I trim a pixie cut?

Every 4 to 6 weeks keeps it sharp and in shape.

Can I style a pixie cut for formal events?

Absolutely! Use accessories, curling tools, or sleek styles to dress it up.

Are pixie cuts hard to grow out?

Not necessarily. A good stylist can transition the cut gracefully with trims and layers.

What products are best for styling pixie haircuts?

Try texturizing sprays, pomades, lightweight waxes, and dry shampoos for volume and texture.

Continue Reading

Fashion

Finger Tattoos: Bold Ink in Small Spaces Ideas & Aftercare

Published

on

Finger Tattoos

Once reserved for the edgy and alternative, finger tattoos have made their way into mainstream fashion and self-expression. From dainty symbols to bold statements, these tiny tattoos offer a mix of style, symbolism, and visibility that’s hard to ignore.

But before you get inked, it’s essential to know what you’re getting into. Finger tattoos come with unique challenges—like faster fading, pain, and limited space—that make research and preparation critical.

What Are Finger Tattoos?

Finger tattoos are small, often minimalist designs inked on the fingers. These can be:

  • On the sides of fingers
  • On the top (knuckles or phalanges)
  • Inside the fingers (palm side)

They range from symbolic icons and initials to meaningful quotes, zodiac signs, or matching couple tattoos. Due to the visibility and skin type on fingers, they require extra attention and care compared to tattoos on other body parts.

Popular Finger Tattoo Ideas

Looking for inspiration? Here are some finger tattoo ideas that are trending:

Minimalist Designs

  • Dots, lines, or tiny symbols
  • Zodiac signs or constellations
  • Small arrows or lightning bolts

Word or Letter Tattoos

  • Initials (yours or a loved one’s)
  • Short words like “LOVE,” “HOPE,” or “FATE” across the knuckles
  • Roman numerals or significant dates

Cultural & Spiritual Symbols

  • Om symbol
  • Cross, crescent moon, or Star of David
  • Evil eye or hamsa hand

Matching or Couple Tattoos

  • Half-hearts that complete when hands are joined
  • King and queen crowns
  • Wedding band alternatives

Pros and Cons of Finger Tattoos

Pros:

  • Visibility: A constant reminder of personal meaning
  • Minimalist appeal: Great for simple, elegant styles
  • Affordability: Smaller size usually means lower cost
  • Customization: You can ink individual fingers for a storytelling effect

Cons:

  • Fast fading: Finger skin sheds more, so tattoos wear out faster
  • Painful: Fingers have thin skin and are close to bone
  • Professional concerns: Some workplaces frown upon visible tattoos
  • Touch-ups required: Most finger tattoos need multiple sessions to maintain clarity

How Much Do Finger Tattoos Hurt?

Let’s be honest: finger tattoos hurt more than tattoos on fleshier parts of your body.

Why?

  • Less fat and muscle padding
  • Dense nerve endings in the fingers
  • Proximity to bone makes it more intense

On a pain scale of 1–10, finger tattoos often rate around 7 or 8. However, it’s tolerable and brief, given the small surface area.

Tip: Stay hydrated and well-rested before your appointment to ease the pain.

Longevity and Fading Issues

If you want a tattoo that lasts crisp and clean for years, finger tattoos might not be your best bet.

Here’s why they fade fast:

  • Constant friction from washing hands, writing, typing
  • Exposure to sun and soap
  • Thinner skin and faster cellular turnover

It’s common for finger tattoos to fade within 6–12 months, especially without touch-ups. Some people require 2–3 follow-up sessions within the first year.

How to Care for a Finger Tattoo

Proper aftercare can extend your finger tattoo’s life and vibrancy.

Finger Tattoo Aftercare Tips:

  1. Keep it dry for the first 24 hours
  2. Wash gently with antibacterial soap
  3. Apply a thin layer of healing ointment (like Aquaphor or Hustle Butter)
  4. Avoid excessive movement and hand washing
  5. No lotions with fragrances or alcohol

Also avoid:

  • Swimming or soaking your hands
  • Picking or peeling the scab
  • Wearing gloves or tight rings during healing

Best Placement: Inner vs. Outer Finger

The placement of your finger tattoo affects both its visibility and longevity.

Outer Finger (Top or Sides)

  • More visible
  • Bolder statement
  • More prone to fading

Inner Finger (Palm Side)

  • More discreet
  • Often chosen for symbolic or secret meanings
  • Fades the fastest due to sweat glands and friction

Choose based on your lifestyle, job, and personal expression preferences.

Are Finger Tattoos Professional?

While society is becoming more accepting of tattoos, visible ink can still be a red flag in some industries.

Industries that may frown on finger tattoos:

  • Corporate finance
  • Law or government positions
  • Hospitality or front-facing roles

That said, fields like tech, design, fashion, and art often embrace self-expression, including tattoos. Always check your company’s dress code policy or use concealer rings or makeup to cover them if needed.

Tips Before Getting a Finger Tattoo

  • Research your artist: Not all tattoo artists specialize in finger work
  • Check portfolios: Look for healed finger tattoos, not just fresh ones
  • Start small: If it’s your first tattoo, begin with a minimal design
  • Avoid excessive details: Small space = simple is better
  • Discuss touch-ups in advance: Some shops offer free or discounted touch-ups

Celebrity Finger Tattoo Inspirations

Celebrities have helped make finger tattoos mainstream:

  • Rihanna: “Shhh…” on her index finger
  • Ariana Grande: “Baby doll” and heart tattoos
  • Beyoncé: Roman numeral IV and a bee on her fingers
  • Justin Bieber: Cross and other minimalist symbols
  • Miley Cyrus: Assorted mini finger tattoos

Celebrity examples show how versatile finger tattoos can be—ranging from dainty to daring.

Conclusion: Is a Finger Tattoo Right for You?

Finger tattoos are bold, beautiful, and deeply personal. But they require extra planning, pain tolerance, and long-term upkeep. If you’re seeking a meaningful, minimal design in a highly visible spot, finger tattoos could be a perfect fit.

Remember: Choose a skilled artist, plan your design carefully, and be ready for maintenance. With the right steps, your finger ink can be as stunning as it is symbolic.

Frequently Asked Questions (FAQs)

Q1: How long do finger tattoos last?

Typically, finger tattoos begin fading after 6 months to 1 year. Touch-ups are usually required for long-term visibility.

Q2: Do finger tattoos hurt more than others?

Yes. The thin skin and proximity to bone make them more painful than tattoos on fleshier areas.

Q3: Can I tattoo over a ring finger?

Absolutely. Many couples get wedding band tattoos. Just keep in mind these fade faster than metal rings.

Q4: Are finger tattoos expensive?

Not usually. Because they’re small, they range between $50–$200 depending on complexity and artist.

Q5: Can finger tattoos get infected easily?

They can—especially since hands are exposed to more bacteria. Good hygiene and aftercare are essential.

Call-to-Action

Thinking about getting a finger tattoo? Share this guide with a friend, save it for your consultation, or leave a comment below with your dream design!

Want more tattoo tips, ideas, and care guides? Subscribe to our newsletter and get inkspiration delivered weekly!

Continue Reading

Trending