Connect with us

Fashion

Microblading: The Ultimate Guide to Perfect Brows

Published

on

Microblading

Are you tired of spending precious minutes each morning filling in your brows? If you’re longing for perfectly shaped, natural-looking eyebrows without the daily hassle, microblading might just be your ticket to brow perfection. This semi-permanent makeup technique has taken the beauty world by storm, giving people the ability to achieve that coveted “just woke up like this” look. Whether you have sparse brows or simply want to enhance your natural shape, microblading can transform your appearance and boost your confidence. Join us as we dive into everything you need to know about this innovative beauty treatment—because flawless brows are always in style!

Understanding Microblading

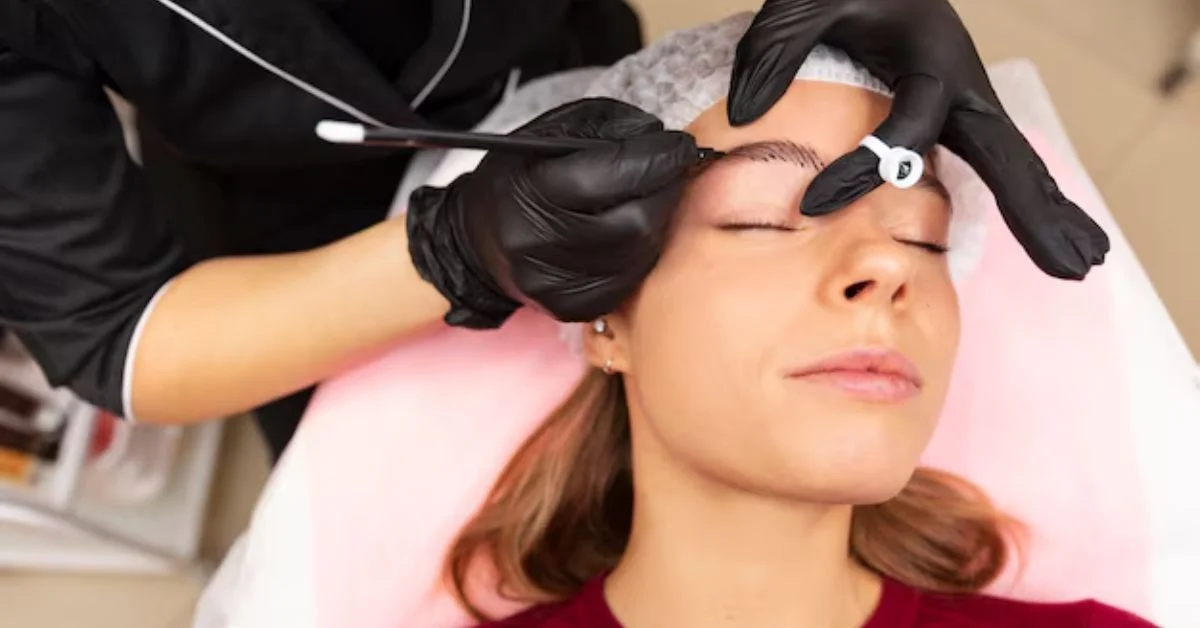
Microblading is a semi-permanent cosmetic tattooing technique specifically designed for eyebrows. Using a small handheld tool, skilled artists create fine hair-like strokes that mimic the natural appearance of brow hairs. This method offers an ideal solution for those looking to enhance their brows without the commitment of traditional tattoos.

The pigment used in microblading is applied into the upper layers of skin, allowing it to last anywhere from one to three years, depending on various factors like skin type and aftercare. Unlike regular eyebrow pencils or powders, microblading provides results that are both long-lasting and realistic.

Each session typically lasts around two hours, including consultation time where you can discuss your desired shape and color with your technician. The outcome can be tailored precisely to match your unique features, ensuring a personalized look every time.

As more people learn about this technique’s benefits, its popularity continues to rise. Microblading not only saves time but also enhances facial symmetry while boosting overall confidence in one’s appearance.

Costs and Considerations

When considering microblading, costs can vary significantly depending on the technician’s experience and location. Typical prices range from $300 to $800 for an initial session. This investment covers not just the procedure but also the quality of materials used and the skilled artistry behind it.

Keep in mind that maintenance is essential. Touch-up sessions are usually required every 6 to 12 months, adding to your overall expense. Factor this into your budget when deciding if microblading is right for you.

It’s also crucial to consider potential additional fees, such as consultation or aftercare products. Researching various professionals will help you find a balance between cost and quality.

Think about any long-term effects on your natural brow hair growth or skin sensitivity. It’s wise to discuss these factors with a qualified technician before committing fully to ensure you’re making an informed choice regarding your brows.

Who Should Consider Microblading

Microblading can be a game-changer for many people looking to enhance their brows. If you struggle with sparse or uneven eyebrows, this technique may offer the perfect solution. It’s especially beneficial for those who have over-plucked in the past and are seeking to restore their natural shape.

Individuals dealing with medical conditions that cause hair loss, such as alopecia or thyroid issues, might also find microblading advantageous. The semi-permanent nature of the treatment provides a way to regain lost confidence without daily makeup application.

People who lead busy lifestyles often appreciate the time-saving aspect of microblading. Once your brows are done, you’ll spend less time getting ready each morning while still achieving that polished look.

If you’re someone who loves experimenting with beauty trends but struggles to achieve flawless results at home, microblading could be an ideal investment in your routine. Embrace effortless beauty and let your brows make a statement!

Pain and Healing Expectations

When considering microblading, pain and healing expectations are crucial aspects to keep in mind. Most clients report that the procedure feels similar to a light scratching sensation. A topical anesthetic is applied beforehand, which helps numb the area and minimize discomfort during the process.

After your appointment, some swelling and redness are common around the brows. This usually subsides within a few days. You might also experience scabbing as part of the natural healing process. It’s essential not to pick at these scabs; doing so can compromise your results.

The initial healing phase typically lasts about two weeks. During this time, you’ll notice color changes as the pigment settles into your skin. It may look darker initially but will soften significantly once fully healed.

Patience is key when waiting for full results. Your brows will continue to evolve over several weeks before you see their true beauty emerge in all its glory.

Preparing for Your Microblading Appointment

Preparing for your microblading appointment is essential for achieving the best results. Start by researching reputable artists in your area. Look at their portfolios and read reviews to ensure you’re selecting someone with experience and skill.

A few days before your appointment, avoid alcohol, caffeine, or blood thinners like aspirin. These substances can increase bleeding during the procedure, which may affect color retention. It’s also wise to refrain from tanning or using topical retinoids on your brows leading up to the session.

Arrive at your appointment with clean skin. This means no makeup on your eyebrows or surrounding areas so that the artist has a clear view of what they’re working with. If possible, wear comfortable clothing since you might be sitting still for a while.

Communicate openly about any concerns or desired outcomes with your artist beforehand. They will appreciate knowing exactly what you’re hoping to achieve and can guide you accordingly throughout the process.

Post-Care Guidelines

After your microblading session, proper aftercare is essential for achieving the best results. First, keep your brows dry and avoid any water exposure for at least a week. This includes avoiding swimming pools and saunas that can cause excess moisture.

Next, refrain from applying makeup to the brow area during the healing process. It’s crucial to allow your skin to recover without interference from cosmetics. If you feel itchy or uncomfortable, resist the urge to scratch your brows; this could lead to uneven healing.

Use an aftercare ointment recommended by your technician sparingly during the first few days. A thin layer will help protect and hydrate the area without clogging pores or causing irritation.

Keep in mind that sun exposure can fade your new brows quickly. When going outside, wear a wide-brimmed hat or sunglasses until you’re fully healed to ensure they maintain their beautiful shape and color longer.

Alternatives to Microblading

For those hesitant about microblading, there are several alternatives worth exploring. One popular option is the eyebrow tinting technique. This method involves applying a semi-permanent dye to enhance existing brow hair, giving a fuller appearance without the commitment of microblading.

Another alternative is using brow powders or pencils. These products allow for precise application and can create natural-looking results tailored to your desired shape and color. They’re great for filling in sparse areas and can be easily removed at the end of the day.

If you prefer something longer-lasting but less invasive than microblading, consider brow gel or pomade. These formulas are designed to hold hairs in place while adding color and thickness. Many brands offer waterproof options that last through sweat and humidity.

If you’re looking for growth solutions, serums specifically formulated for brows can help stimulate hair follicles over time. With consistent use, these serums may lead to naturally fuller brows without any procedures involved.

Brow Products and Tips

Finding the right brow products can significantly enhance your look, whether you’re trying to fill in gaps or maintain your microbladed brows. Start with a good quality brow pencil; it’s perfect for precise application and mimicking hair-like strokes. Look for shades that match your natural color but consider going slightly lighter for a softer effect.

Brow gels are another excellent option. They help keep hairs in place while adding a hint of color and fullness. Choose clear gel if you prefer an invisible hold, or tinted versions to add depth without overwhelming your features.

Don’t forget about brow pomades! These creamy formulas offer long-lasting wear and great pigmentation. Using an angled brush will provide the best control for shaping and defining your brows.

Practice makes perfect! Experimenting with different techniques—like feathering or ombre effects—will help you discover what works best for you. Remember to blend well for a seamless finish that looks effortlessly polished.

READ MORE: Amikaf16: The Future of Smart Technology in Everyday Life

Expert Advice and Recommendations

When considering microblading, it’s wise to do your research and consult with a skilled professional. Look for licensed artists with strong portfolios showcasing their work. Check reviews and testimonials to ensure they have a good reputation.

Before committing, ask about the products they use, as high-quality pigments can affect both the look and longevity of your brows. Discuss any allergies or skin sensitivities you may have during your consultation.

Remember that communication is key. Clearly express what you want, whether it’s natural-looking brows or something bolder. A talented artist will guide you through the process while respecting your preferences.

Don’t forget to discuss touch-up sessions too; these are often necessary for maintaining that flawless finish over time. Following expert advice not only leads to better results but also ensures a safer experience overall in your journey towards perfect brows!

Continue Reading
Click to comment

Leave a Reply

Your email address will not be published. Required fields are marked *

Fashion

Layered Haircuts: The Guide to Volume, Movement & Style

Published

on

Layered Haircuts

Layered haircuts have stood the test of time—and for good reason. Whether you’re going for bouncy volume, easy movement, or a fresh new look, layers can do it all. From sleek and subtle to bold and edgy, layered haircuts offer endless ways to express your personal style while enhancing your natural texture.

This guide will walk you through everything you need to know—from how to choose the best layers for your hair type and face shape to expert styling tips for everyday flair.

What Are Layered Haircuts?

Layered haircuts involve cutting hair at varying lengths to create a series of “layers” that fall over each other. This technique helps reduce bulk, enhance natural texture, and add movement to otherwise lifeless hair.

Unlike blunt cuts that fall evenly, layered cuts allow sections of hair to frame the face, create shape, and balance proportions. Layers can be long and subtle or short and choppy, depending on your desired look.

Benefits of Layered Haircuts

Wondering what makes layered haircuts such a universally loved style? Here’s why they work so well:

  • Adds volume to fine or flat hair
  • Removes weight from thick, heavy strands
  • Creates movement and bounce
  • Shapes the face and enhances features
  • Versatile styling—from ponytails to curls
  • Works for all hair types and textures

Whether you’re trying to grow your hair out or bring life to a shorter cut, layers offer a practical and stylish solution.

Best Layered Haircuts by Hair Length

Short Layered Haircuts

Short layers are ideal for pixie cuts or bob hairstyles. They help create shape and dimension, especially around the crown or jawline.

Popular styles:

  • Textured pixie
  • Stacked bob
  • Shaggy crop

Medium Layered Haircuts

Medium-length layered cuts are easy to maintain and style. They’re great for people who want volume without losing too much length.

Popular styles:

  • Shoulder-length shag
  • Layered lob (long bob)
  • Feathered mid-length cut

Long Layered Haircuts

Long hair can sometimes fall flat without structure. Layers give it life by breaking up the heaviness and adding texture.

Popular styles:

  • V-cut layers
  • Long layers with curtain bangs
  • U-shaped layered cuts

Choosing Layers Based on Face Shape

Choosing the right type of layers can complement and enhance your face shape dramatically.

Face ShapeBest Layer Type
RoundLong face-framing layers to elongate
OvalAlmost all layer styles work well
SquareSoft layers that begin below the jawline
HeartChin-length layers to balance wider forehead
DiamondShoulder-grazing layers with side parts
Long/OblongFull layers starting from cheekbones or chin

A skilled hairstylist will assess your facial features and personalize the layers to suit your aesthetic and facial proportions.

Layered Haircuts for Different Hair Types

Straight Hair

Straight hair benefits from layers because they add movement without curl. Soft layers give it dimension while avoiding a flat look.

Best style: Long layers or blunt cuts with soft layering at the bottom

Wavy Hair

Layers can enhance your natural wave and prevent your hair from looking too triangular or heavy at the ends.

Best style: Shaggy or choppy layers, beachy texture with volume

Curly Hair

With curly hair, layering must be done carefully to maintain shape and bounce. Too many layers can lead to frizz, while the right amount adds definition.

Best style: Deva cut or curly shag, cut when dry for precision

Thick vs. Fine Hair

  • Thick hair: Benefit from debulking layers that remove weight
  • Fine hair: Needs soft, minimal layering to avoid looking sparse

Top Trending Layered Haircut Styles

Staying on trend? Here are the most stylish layered cuts making waves:

1. The Butterfly Haircut

A dramatic, voluminous layered cut with face-framing bangs and layers that “float” like wings.

2. 70s Shag

A retro revival featuring tons of texture, curtain bangs, and a rocker-chic vibe.

3. Wolf Cut

This Gen Z favorite is a mix between the shag and mullet—messy, edgy, and full of personality.

4. Layered Bob with Bangs

Ideal for short to medium-length hair, this combo gives structure while still keeping it soft.

5. Face-Framing Layers

Popular with long hairstyles and perfect for highlighting cheekbones and softening the jawline.

Styling Tips for Maintaining Layered Hair

Want your layers to always look on point? Try these expert-approved tips:

  • Use a volumizing mousse or texturizing spray at the roots
  • Blow-dry with a round brush for bouncy volume
  • Use curling irons or straighteners to define layers
  • Regular trims every 6–8 weeks to maintain shape
  • Deep condition once a week to keep ends healthy
  • Dry shampoo helps keep layers fresh between washes

Common Mistakes to Avoid with Layered Haircuts

Even a trendy haircut can fall flat if not maintained properly. Watch out for these common pitfalls:

  • Too many short layers in thick or curly hair
  • Improper blending leading to choppy or uneven sections
  • Not styling regularly, which can make layers look messy
  • Using the wrong products for your hair type
  • Skipping trims, causing split ends to travel up the layers

Working with a professional stylist is the best way to avoid these issues and get the most out of your cut.

Conclusion: Is a Layered Haircut Right for You?

If you’re ready to refresh your hairstyle with something dynamic, easy to maintain, and endlessly customizable, then layered haircuts are a top-tier option. From enhancing your natural texture to giving fine hair the illusion of volume, layers are a timeless choice for anyone looking to elevate their style.

Don’t be afraid to experiment—layers are as unique as you are.

Frequently Asked Questions

1. Are layered haircuts good for thin hair?

Yes! Light layers can add volume and movement to thin hair without making it look sparse.

2. How often should I get my layers trimmed?

For best results, trim every 6–8 weeks to maintain shape and prevent split ends.

3. Can layered haircuts work with bangs?

Absolutely. Curtain bangs, wispy bangs, and blunt fringe all pair beautifully with layered styles.

4. What’s the difference between step cut and layered cut?

A step cut has more defined levels, while a layered cut has a more blended and gradual effect.

5. Will layers make my hair look thinner?

When done incorrectly, yes. But the right type of layering can add volume and texture without thinning the look.

Call to Action

Loved these layered haircut ideas?
Share this article, save it for your next salon visit, or subscribe to our newsletter for more expert hair advice, trends, and tutorials!

Continue Reading

Fashion

Best Pixie Haircuts for a Bold New Look For You in 2025

Published

on

Pixie Haircuts

Thinking about going short and bold? A pixie haircut could be exactly what you’re looking for. Known for its chic, low-maintenance appeal, pixie cuts are redefining beauty standards in 2025. This complete guide will help you understand everything about pixie haircuts, from choosing the right style to maintaining your new look with confidence.

What Are Pixie Haircuts?

Pixie haircuts are short hairstyles that typically cut the hair short on the back and sides while leaving slightly longer layers on top. The result is a flattering, edgy look that’s versatile and timeless.

Common features include:

  • Cropped sides
  • Layered or textured top
  • Optional bangs or fringe

Originally made popular in the 1950s and ’60s, pixie cuts have evolved into modern variations that suit nearly every personality and aesthetic.

Why Pixie Haircuts Are Trending in 2025

In 2025, we’re seeing a cultural shift toward bold self-expression and sustainable beauty. Pixie cuts fit perfectly into this narrative. Here’s why:

  • Minimal styling products = eco-friendly
  • Low maintenance in a fast-paced world
  • Empowering look that celebrates individuality
  • Ideal for warmer climates and active lifestyles

Social media has also played a role. Platforms like TikTok and Instagram are filled with transformation videos showcasing stunning pixie cut reveals—boosting the style’s popularity among Gen Z and millennials alike.

Benefits of a Pixie Cut

Choosing a pixie haircut has many benefits:

1. Low Maintenance

No more hour-long blowouts. Most pixie cuts dry quickly and require minimal product.

2. Versatility

Despite being short, pixie haircuts offer room for personalization:

  • Asymmetrical pixies
  • Pixie bobs
  • Undercuts

3. Highlights Facial Features

A pixie frames your face beautifully, drawing attention to your cheekbones, eyes, and jawline.

4. Cool and Comfortable

Perfect for summer or tropical climates.

5. Symbol of Confidence

Going short can be a bold move. It sends a message of strength, confidence, and self-assurance.

Types of Pixie Haircuts

There’s a pixie style for every vibe. Let’s break them down:

1. Classic Pixie

Short back and sides with uniform length on top.

2. Pixie Bob

A longer pixie that flirts with bob territory—great for those easing into short hair.

3. Textured Pixie

Choppy layers add volume and edge. Perfect for fine hair.

4. Asymmetrical Pixie

One side is longer than the other for a bold, fashion-forward look.

5. Undercut Pixie

Sides are shaved or buzzed while the top remains long.

6. Curly Pixie

Tailored for natural curls or perms. Embraces volume and bounce.

7. Long Pixie with Bangs

Perfect for softening the face while maintaining short length.

How to Choose the Best Pixie Haircut for Your Face Shape

Matching your haircut to your face shape makes a huge difference. Here’s a quick guide:

1. Oval Face

Almost any pixie style suits an oval face. Try a textured pixie or asymmetrical cut.

2. Round Face

Opt for volume at the crown and longer side-swept bangs to elongate the face.

3. Square Face

Soften angles with feathered layers and wispy bangs.

4. Heart-Shaped Face

Balance a wider forehead with side bangs and volume at the nape.

5. Long Face

Choose a fuller, tousled pixie with horizontal volume.

Maintenance Tips and Styling Advice

Though easy to maintain, pixie haircuts still need care:

  • Trims every 4-6 weeks to keep the shape
  • Use texturizing spray or pomade to style
  • Dry shampoo helps add lift and freshness
  • Silk pillowcase to reduce friction and maintain style

Quick Styling Tips:

  • For volume: blow-dry with a round brush
  • For edgy texture: apply wax and tousle
  • For sleek look: use a flat iron and smoothing cream

Celebrity Inspiration: Iconic Pixie Haircuts

Pixie haircuts have graced many famous faces. Here are a few inspiring celebs:

  • Halle Berry – Known for her signature choppy pixie
  • Zoë Kravitz – Elegant, minimalist short pixie
  • Emma Watson – Chic and classy cut during her post-Harry Potter era
  • Charlize Theron – Sleek, side-parted pixie for the red carpet
  • Rihanna – Edgy undercut pixie with attitude

These stars show how versatile and empowering pixie haircuts can be.

Conclusion: Is a Pixie Cut Right for You?

The beauty of pixie haircuts lies in their ability to reflect individuality. Whether you’re after a low-maintenance lifestyle, a bold new look, or a stylish reinvention, there’s a pixie cut that’s perfect for you.

Ready to make the cut? Talk to your stylist, show them inspiration pics, and embrace the freedom of short hair. You might just fall in love with your new look.

FAQs

Do pixie cuts suit everyone?

With the right cut for your face shape and hair texture, almost anyone can rock a pixie.

How often should I trim a pixie cut?

Every 4 to 6 weeks keeps it sharp and in shape.

Can I style a pixie cut for formal events?

Absolutely! Use accessories, curling tools, or sleek styles to dress it up.

Are pixie cuts hard to grow out?

Not necessarily. A good stylist can transition the cut gracefully with trims and layers.

What products are best for styling pixie haircuts?

Try texturizing sprays, pomades, lightweight waxes, and dry shampoos for volume and texture.

Continue Reading

Fashion

Finger Tattoos: Bold Ink in Small Spaces Ideas & Aftercare

Published

on

Finger Tattoos

Once reserved for the edgy and alternative, finger tattoos have made their way into mainstream fashion and self-expression. From dainty symbols to bold statements, these tiny tattoos offer a mix of style, symbolism, and visibility that’s hard to ignore.

But before you get inked, it’s essential to know what you’re getting into. Finger tattoos come with unique challenges—like faster fading, pain, and limited space—that make research and preparation critical.

What Are Finger Tattoos?

Finger tattoos are small, often minimalist designs inked on the fingers. These can be:

  • On the sides of fingers
  • On the top (knuckles or phalanges)
  • Inside the fingers (palm side)

They range from symbolic icons and initials to meaningful quotes, zodiac signs, or matching couple tattoos. Due to the visibility and skin type on fingers, they require extra attention and care compared to tattoos on other body parts.

Popular Finger Tattoo Ideas

Looking for inspiration? Here are some finger tattoo ideas that are trending:

Minimalist Designs

  • Dots, lines, or tiny symbols
  • Zodiac signs or constellations
  • Small arrows or lightning bolts

Word or Letter Tattoos

  • Initials (yours or a loved one’s)
  • Short words like “LOVE,” “HOPE,” or “FATE” across the knuckles
  • Roman numerals or significant dates

Cultural & Spiritual Symbols

  • Om symbol
  • Cross, crescent moon, or Star of David
  • Evil eye or hamsa hand

Matching or Couple Tattoos

  • Half-hearts that complete when hands are joined
  • King and queen crowns
  • Wedding band alternatives

Pros and Cons of Finger Tattoos

Pros:

  • Visibility: A constant reminder of personal meaning
  • Minimalist appeal: Great for simple, elegant styles
  • Affordability: Smaller size usually means lower cost
  • Customization: You can ink individual fingers for a storytelling effect

Cons:

  • Fast fading: Finger skin sheds more, so tattoos wear out faster
  • Painful: Fingers have thin skin and are close to bone
  • Professional concerns: Some workplaces frown upon visible tattoos
  • Touch-ups required: Most finger tattoos need multiple sessions to maintain clarity

How Much Do Finger Tattoos Hurt?

Let’s be honest: finger tattoos hurt more than tattoos on fleshier parts of your body.

Why?

  • Less fat and muscle padding
  • Dense nerve endings in the fingers
  • Proximity to bone makes it more intense

On a pain scale of 1–10, finger tattoos often rate around 7 or 8. However, it’s tolerable and brief, given the small surface area.

Tip: Stay hydrated and well-rested before your appointment to ease the pain.

Longevity and Fading Issues

If you want a tattoo that lasts crisp and clean for years, finger tattoos might not be your best bet.

Here’s why they fade fast:

  • Constant friction from washing hands, writing, typing
  • Exposure to sun and soap
  • Thinner skin and faster cellular turnover

It’s common for finger tattoos to fade within 6–12 months, especially without touch-ups. Some people require 2–3 follow-up sessions within the first year.

How to Care for a Finger Tattoo

Proper aftercare can extend your finger tattoo’s life and vibrancy.

Finger Tattoo Aftercare Tips:

  1. Keep it dry for the first 24 hours
  2. Wash gently with antibacterial soap
  3. Apply a thin layer of healing ointment (like Aquaphor or Hustle Butter)
  4. Avoid excessive movement and hand washing
  5. No lotions with fragrances or alcohol

Also avoid:

  • Swimming or soaking your hands
  • Picking or peeling the scab
  • Wearing gloves or tight rings during healing

Best Placement: Inner vs. Outer Finger

The placement of your finger tattoo affects both its visibility and longevity.

Outer Finger (Top or Sides)

  • More visible
  • Bolder statement
  • More prone to fading

Inner Finger (Palm Side)

  • More discreet
  • Often chosen for symbolic or secret meanings
  • Fades the fastest due to sweat glands and friction

Choose based on your lifestyle, job, and personal expression preferences.

Are Finger Tattoos Professional?

While society is becoming more accepting of tattoos, visible ink can still be a red flag in some industries.

Industries that may frown on finger tattoos:

  • Corporate finance
  • Law or government positions
  • Hospitality or front-facing roles

That said, fields like tech, design, fashion, and art often embrace self-expression, including tattoos. Always check your company’s dress code policy or use concealer rings or makeup to cover them if needed.

Tips Before Getting a Finger Tattoo

  • Research your artist: Not all tattoo artists specialize in finger work
  • Check portfolios: Look for healed finger tattoos, not just fresh ones
  • Start small: If it’s your first tattoo, begin with a minimal design
  • Avoid excessive details: Small space = simple is better
  • Discuss touch-ups in advance: Some shops offer free or discounted touch-ups

Celebrity Finger Tattoo Inspirations

Celebrities have helped make finger tattoos mainstream:

  • Rihanna: “Shhh…” on her index finger
  • Ariana Grande: “Baby doll” and heart tattoos
  • Beyoncé: Roman numeral IV and a bee on her fingers
  • Justin Bieber: Cross and other minimalist symbols
  • Miley Cyrus: Assorted mini finger tattoos

Celebrity examples show how versatile finger tattoos can be—ranging from dainty to daring.

Conclusion: Is a Finger Tattoo Right for You?

Finger tattoos are bold, beautiful, and deeply personal. But they require extra planning, pain tolerance, and long-term upkeep. If you’re seeking a meaningful, minimal design in a highly visible spot, finger tattoos could be a perfect fit.

Remember: Choose a skilled artist, plan your design carefully, and be ready for maintenance. With the right steps, your finger ink can be as stunning as it is symbolic.

Frequently Asked Questions (FAQs)

Q1: How long do finger tattoos last?

Typically, finger tattoos begin fading after 6 months to 1 year. Touch-ups are usually required for long-term visibility.

Q2: Do finger tattoos hurt more than others?

Yes. The thin skin and proximity to bone make them more painful than tattoos on fleshier areas.

Q3: Can I tattoo over a ring finger?

Absolutely. Many couples get wedding band tattoos. Just keep in mind these fade faster than metal rings.

Q4: Are finger tattoos expensive?

Not usually. Because they’re small, they range between $50–$200 depending on complexity and artist.

Q5: Can finger tattoos get infected easily?

They can—especially since hands are exposed to more bacteria. Good hygiene and aftercare are essential.

Call-to-Action

Thinking about getting a finger tattoo? Share this guide with a friend, save it for your consultation, or leave a comment below with your dream design!

Want more tattoo tips, ideas, and care guides? Subscribe to our newsletter and get inkspiration delivered weekly!

Continue Reading

Trending