Connect with us

Education

How Realistic Wolf Drawing Is Possible: Step-by-Step Guide

Published

on

Wolf Drawing

Wolves have long captivated the human imagination. Their majestic presence and keen intelligence make them a popular subject for artists and nature enthusiasts alike. If you’ve ever found yourself mesmerized by their beauty, you might be compelled to capture that essence on paper through wolf drawing.

Whether you’re an aspiring artist or someone looking to improve your skills, learning wolf drawing is a rewarding journey. It’s not just about putting pencil to paper; it’s about understanding these magnificent creatures in all their glory. From the intricate details of their fur to the piercing gaze of their eyes, every element plays a crucial role in bringing your artwork to life.

In this guide, we will take you through each step of creating a stunning wolf drawing—from grasping basic anatomy to perfecting those final touches that add depth and emotion. With some practice and patience, you’ll transform simple sketches into masterpieces that pay homage to one of nature’s most awe-inspiring animals. So grab your pencils and let’s embark on this artistic adventure together!

Understanding Wolf Anatomy for Drawing

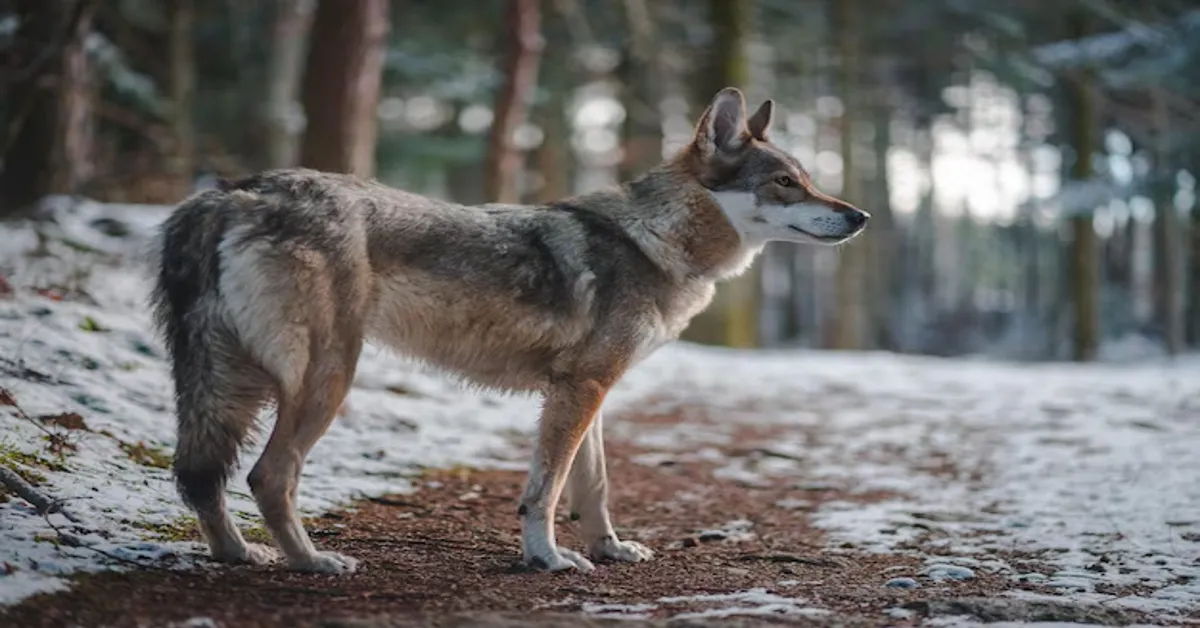
To create a realistic wolf drawing, understanding the animal’s anatomy is essential. Wolves have a unique skeletal structure that influences how they move and pose. Familiarize yourself with their proportions—most adult wolves stand about 26 to 32 inches tall at the shoulder and can weigh between 50 to 110 pounds.

Start by studying their body shape. Wolves possess long, lean bodies with strong legs designed for endurance running. Their chests are broad, allowing for powerful lung capacity during hunts. Pay attention to these features as you sketch, ensuring your wolf looks agile yet muscular.

Next, explore the head structure. A wolf’s skull is distinctively shaped with a pronounced snout and high cheekbones. This gives them an expressive face that’s crucial for conveying emotion in your artwork. Observe how these facial structures influence expressions; subtle shifts can bring your drawing to life.

The limbs also deserve close examination. Wolves have large paws equipped for various terrains—from snow-covered landscapes to rocky paths. Note how their joints articulate; this knowledge will help you portray movement more naturally in your drawings.

Don’t forget the tail! A wolf’s bushy tail serves multiple purposes—it helps maintain balance while running and communicates emotions through positioning and movements.

Taking time to study these anatomical details will provide clarity as you begin sketching your realistic wolf drawing, creating a solid foundation for capturing its essence on paper.

Starting Your Wolf Drawing: Sketching Techniques

Starting your wolf drawing requires a good foundation. Begin with simple shapes. Use circles and ovals to outline the head, body, and limbs of the wolf. This method helps establish proportions without overwhelming details.

Once you have these shapes in place, refine them into more defined forms. Gently sketch guidelines for the face. Pay attention to where the features will go—such as eyes, nose, and mouth—to maintain balance in your composition.

Next, focus on posture and movement. Wolves convey strength and agility. Consider depicting a stance that captures these qualities; perhaps they’re standing tall or mid-stride during a run.

Use light pressure when sketching initially so you can easily erase any mistakes later on. It’s common to feel uncertain at this stage; remember that adjustments are part of the process.

Incorporate basic lines for fur direction as you progress through your initial sketching stages. These lines will guide how you add texture later on while also enhancing realism from the start.

Step back occasionally to assess proportions and overall shape against references or images of wolves if needed. Don’t hesitate to make changes before committing fully to details—it’s all about getting it right early in your drawing journey!

Adding Realism: Depth, Texture, and Shading

To elevate your wolf drawing, focus on depth, texture, and shading. These elements breathe life into your artwork. They create a three-dimensional feel that draws viewers in.

Start with understanding light sources. The way light interacts with surfaces will dictate where shadows fall. Identify where the light hits your wolf and where it creates darker areas. This contrast is essential for realism.

Next, consider using different pencil grades to achieve depth. Softer pencils (like 2B or 4B) are perfect for dark shadows, while harder pencils (like H or 2H) can help create lighter tones. Layering these grades can produce rich textures that make fur appear more lifelike.

Texture plays a vital role as well. Pay attention to the unique characteristics of a wolf’s coat—its thickness, length, and how it lies against their body shape. Use short strokes for finer details and longer strokes for larger areas to mimic the natural flow of fur.

Don’t forget about blending techniques! Using tools like blending stumps or even your fingers can soften harsh lines and merge different shades seamlessly. This technique adds smoothness to your drawing without losing detail.

Remember that subtlety is key when adding these elements together; overdoing them might detract from your work’s overall authenticity. Aim for balance between shadowed areas and highlights to ensure each part complements the entire composition beautifully.

Detailing the Wolf’s Facial Features

Detailing the wolf’s facial features is crucial for achieving realism in your wolf drawing. Start with the eyes, which are often considered the windows to the soul. Wolves have expressive eyes that can showcase a range of emotions. Pay attention to their shape; they tend to be almond-shaped with a slight slant. Use shading and highlights to give them depth, making sure they draw viewers in.

Next, focus on the nose. A wolf’s nose is typically large and slightly rounded at the tip. Capture its texture by adding subtle lines and variations in shade. The nostrils should also be defined but not overly harsh; softness contributes to realism.

The mouth area deserves special attention as well. Wolves have strong jaws that convey power yet can appear gentle when closed. Draw fine lines around their lips to indicate muscle tone without overemphasizing it.

Ears play a significant role too—they should stand upright or may tilt depending on your chosen pose or expression for your drawing subject. Observe how light interacts with them while you sketch; this will help create dimension.

Don’t forget about fur along the face! Each stroke adds character and complexity, particularly where it meets other features like ears or jawlines.

Taking time with these details transforms an ordinary sketch into something extraordinary, allowing your wolf drawing to truly come alive on paper.

Creating Realistic Fur Texture

Creating realistic fur texture can elevate your wolf drawing from simple to stunning. The key lies in understanding how light interacts with fur and the different lengths of hair covering a wolf’s body.

Begin by observing real wolves or high-quality photographs. Notice the patterns, colors, and lengths of fur across their bodies. Wolves often have varying shades that create depth; incorporate these subtle differences into your work.

Start with a base layer using light strokes to map out where the fur will go. This initial sketch should be soft and lack defined edges, allowing for adjustments later on. Use a pencil or fine-tipped pen for this stage.

Next, focus on layering. Gradually build up darker tones to represent shadows under layers of fur. Varying pressure on your pencil can give you both thick and thin lines that mimic natural hair strands effectively.

Don’t forget about directionality! Fur grows in specific directions depending on the part of the body you’re depicting—around the face it may curve elegantly while along the back it runs straight downwards.

For finishing touches, use an eraser lightly to highlight areas where sunlight hits directly. This technique adds realism by creating contrast between shadowed sections and illuminated ones, making your wolf look truly lifelike.

Perfecting the Details: Ears, Eyes, and Nose

When wolf drawing, the details of the ears, eyes, and nose play a crucial role in bringing your artwork to life. Start with the ears; they are typically pointed and triangular. Pay attention to their position on the head. A slight tilt can convey different emotions. Use gentle curves for soft edges and sharp angles for alertness.

Next comes the eyes, which serve as windows to character and emotion. Wolves often have striking yellow or amber irises that stand out against darker pupils. Capturing this contrast is essential for realism. Consider adding highlights to make them shine; a well-placed reflection can add depth.

The shape of the eye is equally important—slightly almond-shaped will give your wolf an intense look while rounded shapes can soften its expression. Don’t forget about eyelashes! Even subtle lines can enhance expressiveness.

Moving on to the nose, it should be broad and slightly rounded at the tip. Darker shading here adds dimension and brings focus back up toward those captivating eyes you’ve drawn so carefully.

Pay close attention to textures around these features too—the fur around their face has unique patterns that help define them individually. Layering finer strokes will create more lifelike qualities.

Ensure each detail harmonizes with one another; balance between bold contrasts in color or tone helps unify your entire piece into something truly stunning—a perfect representation of nature’s beauty captured through your pencil or brush.

Finalizing Your Realistic Wolf Drawing

Once you’ve added all the essential elements to your wolf drawing, it’s time to focus on finalizing the piece. This step is crucial for achieving a polished and professional look. Start by reviewing your entire artwork, checking for any inconsistencies or areas that might need additional attention.

Enhance the contrast in your shading to make certain features pop. Darker shades can add depth and drama to wolf drawing while lighter highlights will draw the viewer’s eye toward focal points like the eyes or snout. Use an eraser sparingly to lift some graphite where light would naturally reflect off fur or features.

Pay special attention to edges; they should vary between soft and hard lines depending on what you’re depicting. A wolf’s face has both gentle curves and sharp angles, so strive for balance in how those traits are represented in wolf drawing.

Consider adding a background that complements your wolf drawing without overpowering it. Simple textures like trees or snow can enhance realism without distracting from your subject.

Sign your work! Your signature marks not just ownership but also pride in what you’ve created. Stepping back and viewing everything as a whole is vital before declaring it finished. Enjoy this moment of accomplishment; transforming your initial wolf drawing sketches into a stunning representation of one of nature’s most captivating creatures is no small feat.

Continue Reading
Click to comment

Leave a Reply

Your email address will not be published. Required fields are marked *

Education

The Cruel Prince By H.Black: Themes, Characters and Analysis

Published

on

The Cruel Prince

“The Cruel Prince,” written by Holly Black, is a stunning entry into the world of young adult fantasy literature. The novel masterfully blends dark themes, intricate world-building, and complex character arcs, making it an unforgettable journey into the realm of Faerie. As the first book in “The Folk of the Air” series, “The Cruel Prince” sets the stage for a tale filled with intrigue, power struggles, and the pursuit of identity.

Synopsis of “The Cruel Prince”

“The Cruel Prince” follows the story of Jude Duarte, a mortal girl thrust into the world of Faerie after her parents are murdered by Madoc, a faerie general. Alongside her twin sister Taryn and their half-sister Vivienne, Jude grows up in the High Court of Faerie. Despite being human, Jude yearns for power and acceptance in a world that dismisses her as inferior. Her journey intertwines with the dark and enigmatic Prince Cardan, leading to a series of alliances, betrayals, and revelations that challenge everything she knows.

READ MORE:The://vital-mag.net Blog: Technology and Lifestyle Insights

Themes in “The Cruel Prince”

  1. Power and Ambition:
  2. Jude’s relentless pursuit of power forms the backbone of “The Cruel Prince.” Her ambition drives her to navigate the perilous politics of Faerie, making morally ambiguous choices along the way.
  3. Identity and Belonging:
  4. As a mortal in the Faerie world, Jude grapples with her identity and her desire to belong. The novel explores the tension between embracing one’s humanity and striving to fit into an alien world.
  5. Deception and Betrayal:
  6. Faerie is a realm rife with deceit. Jude learns to manipulate and outwit her adversaries, often questioning her own morality in the process.
  7. Love and Hatred:
  8. The intricate dynamics between Jude and Prince Cardan add a layer of emotional complexity. Their relationship oscillates between animosity and a deep, unspoken connection.
  9. READ MORE:Kim’s Lost Words: Explore Emotions and Unspoken Connections

Character Analysis

Jude Duarte:

Jude is a fiercely determined protagonist. Her transformation from a vulnerable mortal to a cunning player in Faerie politics is both inspiring and unsettling.

Prince Cardan:

Cardan’s initial portrayal as cruel and indifferent gradually reveals a character shaped by trauma and hidden depth. His arc in it sets the stage for future developments in the series.

Madoc:

As Jude’s adoptive father and the murderer of her parents, Madoc is a paradoxical figure. His actions are both ruthless and protective, reflecting the complex morality of Faerie.

READ MORE:“Go Piss Girl” Meme: Origins, Popularity, and Impact

World-Building in “The Cruel Prince”

Holly Black excels at creating an immersive world. The Faerie realm in novel is a place of beauty and danger, filled with intricate details that bring it to life:

  • Courts and Hierarchies: The political structure of Faerie is elaborately depicted, showcasing the power struggles and alliances that drive the story.
  • Magic and Mythology: Enchantments, magical creatures, and ancient traditions form the fabric of the world, adding depth and authenticity.
  • Human-Faerie Dynamics: The contrast between mortal fragility and faerie immortality is a recurring theme, highlighting the precarious position of humans in this realm.

Reception of “The Cruel Prince”

“The Cruel Prince” has been widely praised for its compelling narrative and nuanced characters:

  • Critical Acclaim: Reviewers have lauded Holly Black’s ability to subvert traditional fantasy tropes, creating a story that is both fresh and engaging.
  • Fan Appreciation: The book’s exploration of morally gray characters and its gripping plot have resonated with readers, earning it a dedicated fanbase.

Key Moments in “The Cruel Prince”

  • Madoc’s Betrayal: The opening scene where Madoc murders Jude’s parents sets the tone for the novel’s dark themes.
  • Jude’s Oath: Jude’s decision to serve as a spy in the Faerie court marks a turning point in her quest for power.
  • The Coronation: The chaotic events during the coronation ceremony reveal hidden alliances and foreshadow future conflicts.

Why “The Cruel Prince” Stands Out

Complex Characters:

Each character in “The Cruel Prince” is deeply flawed and multifaceted, making them relatable and intriguing.

Moral Ambiguity:

The novel challenges traditional notions of good and evil, presenting a world where survival often necessitates compromise.

Rich Prose:

Holly Black’s writing style is lyrical and evocative, capturing the ethereal beauty and peril of the Faerie world.

CLICK HERE FOR MORE

FAQs About “The Cruel Prince”

  1. What genre is “The Cruel Prince”? “The Cruel Prince” is a young adult fantasy novel.
  2. Is “The Cruel Prince” part of a series? Yes, it is the first book in “The Folk of the Air” trilogy.
  3. Who are the main characters? The main characters include Jude Duarte, Prince Cardan, Madoc, Taryn Duarte, and Vivienne.
  4. What age group is “The Cruel Prince” suitable for? It is targeted at young adult readers but contains mature themes suitable for older audiences.
  5. What are the sequels to “The Cruel Prince”? The sequels are “The Wicked King” and “The Queen of Nothing.”
  6. Has “The Cruel Prince” been adapted into a movie or TV series? As of now, there is no official adaptation, though fans eagerly await one.

Continue Reading

Education

Simple Guide to Convert 29 Celsius to Fahrenheit

Published

on

29 Celsius to Fahrenheit

Converting temperatures can sometimes feel like a daunting task, especially when you’re trying to figure out how hot it really is outside. Whether you’re planning a beach day or checking the weather for your next hike, understanding temperature conversions is essential. If you’ve ever wondered what 29 Celsius to Fahrenheit, you’re not alone!

This guide will help you easily navigate the Celsius and Fahrenheit scales so that you’ll never be caught off guard by temperature differences again. We’ll break down everything from basic definitions to conversion methods and even provide handy resources for quick reference. Let’s dive in and demystify this common conversion together!

Celsius and Fahrenheit Explained

Celsius and Fahrenheit are two of the most commonly used temperature scales around the world. Each has its own unique history, origin, and application. Understanding these differences can make it easier to navigate weather reports or cooking instructions.

The Celsius scale is widely adopted in most countries. It’s based on the freezing point of water at 0 degrees and boiling point at 100 degrees under standard atmospheric conditions. This makes it intuitive for everyday use, especially when discussing weather.

Fahrenheit, on the other hand, is primarily used in the United States and a few Caribbean nations. The scale defines the freezing point of water as 32 degrees and its boiling point as 212 degrees. This means that Fahrenheit temperatures seem less straightforward compared to Celsius.

One key difference lies in their increments; each degree on the Celsius scale represents a larger change in temperature than one degree on the Fahrenheit scale. This can lead to some confusion if you’re accustomed to only one measurement system.

Despite these differences, both scales serve their purposes well within their respective regions. Weather forecasts typically utilize Celsius outside North America while many Americans rely heavily on Fahrenheit for daily life.

Being aware of both systems enables better communication about temperature across different cultures or disciplines like science and cooking where precision matters greatly!

Conversion Formula and Calculator

To convert 29 Celsius to Fahrenheit, you can use a simple formula. This is essential for anyone needing quick temperature conversions. The formula goes like this: multiply the Celsius temperature by 1.8 and then add 32.

So, if you want to convert 29 degrees Celsius to Fahrenheit, start with multiplying it by 1.8. That gives you about 52.2 when calculated precisely. Next, take that result and add 32 to it.

The math looks like this:
(29 * 1.8) + 32 = ?
This leads us directly to your answer of approximately 84.2 degrees Fahrenheit.

If you’re not comfortable with manual calculations or prefer convenience, there are many online calculators available for instant results. You simply enter the Celsius value, click a button, and voilà! It displays the equivalent in Fahrenheit instantly.

Mobile apps also provide handy conversion tools right at your fingertips—ideal whether you’re cooking or traveling abroad where different measurement systems are used.

These options make converting temperatures easier than ever before! Whether you’re using formulas or digital tools, getting from Celsius to Fahrenheit has never been simpler.

How to Convert 29 Celsius to Fahrenheit

Converting 29 Celsius to Fahrenheit is a straightforward process once you understand the formula. The mathematical relationship between these two temperature scales can be boiled down into a simple equation: F = (C × 9/5) + 32.

To begin, take your Celsius value—in this case, it’s 29 degrees. Start by multiplying this number by 9/5 or simply 1.8. This calculation gives you the first part of the conversion.

Next, multiply:
29 × 1.8 = 52.2

Now, you have your result ready for the next step in the formula.

The final stage involves adding 32 to that product from before.
So, proceed with:
52.2 + 32 = 84.2

This means that when converting from 29 Celsius to Fahrenheit using our example of 29 Celsius to Fahrenheit, you’ll arrive at an equivalent temperature of about 84.2 degrees Fahrenheit.

If math isn’t your strong suit or if you’re looking for quicker solutions, there are many online calculators available as well! Simply input “29 C” into any reliable temperature conversion tool and get instant results without doing any calculations yourself.

Using accurate conversions is essential whether you’re cooking recipes or planning travel based on weather forecasts where temperatures vary across regions worldwide.

Celsius to Fahrenheit Conversion Table

When it comes to temperature conversions, having a quick reference can be incredibly useful. A Celsius to Fahrenheit conversion table provides an easy way to look up various temperatures without needing to do the math each time.

For instance, knowing that 0 degrees Celsius equals 32 degrees Fahrenheit is fundamental for anyone working with international weather data or cooking recipes from different countries. You might also find it handy when planning outdoor activities based on temperature.

As you go up the scale, things become more interesting. At 20 degrees Celsius, you’re looking at about 68 degrees Fahrenheit—perfect for a pleasant spring day in many regions. This kind of information helps people decide what to wear or how to prepare their homes for seasonal changes.

At 29 Celsius to Fahrenheit specifically, you’ll find yourself at around 84.2 degrees Fahrenheit—a warm temperature ideal for beach outings and barbecues. It’s important not only for those living in warmer climates but also travelers who need to pack accordingly.

Conversely, if you’re dealing with colder numbers like -10 degrees Celsius, that translates roughly into 14 degrees Fahrenheit. Such details are crucial during winter months when preparing your home or vehicle against freezing conditions.

A well-organized table makes these comparisons straightforward and eliminates guesswork from daily life decisions related to weather and comfort levels.

Additional Resources

When it comes to understanding temperature conversions, having the right resources can be incredibly helpful. Whether you’re a student, a professional in science or cooking, or simply curious about how Celsius and Fahrenheit relate to each other, there are plenty of tools at your disposal.

For those wanting quick calculations without manual work, numerous online calculators allow you to convert any Celsius value into Fahrenheit within seconds. Websites like UnitConverter.net and RapidTables.com offer user-friendly interfaces that make conversion simple and efficient.

If you’re interested in learning more about temperature scales beyond just basic conversions, consider exploring educational resources such as Khan Academy or Coursera. They provide engaging lessons on thermodynamics and measurement systems that deepen your understanding of these concepts.

Additionally, mobile apps dedicated to unit conversions can be extremely useful when you’re on the go. Apps like “Convert Units” or “Units Plus” not only assist with temperature but also cover various units including length, weight, volume, and more.

For anyone who enjoys DIY projects or culinary adventures in the kitchen where precision is key—having access to reliable conversion charts will enhance your experience significantly. Various printable templates are available online for quick reference without needing internet access.

With these resources at your fingertips, converting 29 Celsius to Fahrenheit—and any other measurements—becomes an effortless task!

READ MORE:Convert 50 F to C: Simple Conversion Guide and Practical Tips

Continue Reading

Education

Convert 16 Celsius to Fahrenheit – Formula, and Applications

Published

on

16 Celsius to Fahrenheit

When it comes to temperature, the differences between Celsius and Fahrenheit can sometimes leave us scratching our heads. If you’ve ever found yourself wondering what 16 degrees Celsius feels like in Fahrenheit, you’re not alone. This seemingly simple conversion is essential for travel, cooking, or even just planning your day.

Whether you’re a traveler heading to a new destination or someone trying to understand weather reports better, knowing how to convert temperatures can make life easier. With just a few simple steps, you can master the art of temperature conversion and impress your friends with your newfound knowledge.

Let’s dive in and unravel the mystery of converting 16 Celsius to Fahrenheit!

How to Convert 16 Celsius to Fahrenheit

Converting 16 Celsius to Fahrenheit is a straightforward process that anyone can master. To start 16 Celsius to Fahrenheit , you’ll need the formula for conversion: multiply the Celsius temperature by 1.8 and then add 32. It sounds more complicated than it really is, but once you break it down step-by-step, it becomes much easier.

First, take your starting temperature—16 degrees Celsius. Multiply this number by 1.8. Doing the math gives you 28.8, which is a crucial part of our calculation.

Next comes the simple addition. Take that result of 28.8 and add 32 to it. This brings you to a total of 60.8 degrees Fahrenheit.

Now you’ve successfully converted from 16 Celsius to Fahrenheit ! If you’re looking at weather forecasts or cooking recipes that use different systems, having this knowledge in your back pocket can help avoid confusion.

It’s also helpful to remember that this method works for any temperature conversion between these two scales—not just for chilly days like when it’s at 16 Celsius to Fahrenheit !

So next time someone asks you what’s on their thermometer when they say “it’s only sixteen,” you’ll know exactly how warm (or cool) it actually feels in Fahrenheit!

Celsius to Fahrenheit Conversion Table

Understanding temperature conversions can be quite handy, especially when traveling or cooking. A Celsius to Fahrenheit conversion table serves as a quick reference guide for anyone needing to make these calculations.

On the table, you will find various Celsius temperatures and their corresponding Fahrenheit values. For instance, 0 degrees Celsius is equivalent to 32 degrees Fahrenheit. This basic point is crucial since it’s often where many people start when converting temperatures.

As you move up the scale, you’ll notice that every increase of 1 degree Celsius adds about 1.8 degrees in Fahrenheit. So at 10 degrees Celsius, you’re looking at approximately 50 degrees Fahrenheit. This pattern continues consistently throughout the range.

For those curious about common benchmarks like room temperature or body temperature: Room temperature typically hovers around 20-22 degrees Celsius or roughly between 68-72 degrees Fahrenheit. Meanwhile, normal human body temperature sits close to 37 degrees Celsius, translating to about 98.6 degrees Fahrenheit.

A well-organized conversion table can also help visualize other critical points—freezing and boiling water are key examples here too! Water freezes at 0°C (32°F) and boils at100°C (212°F). These essential markers serve as perfect reference points for everyday situations.

With this simple tool in hand, converting from one unit to another becomes less daunting! Whether you’re checking weather forecasts or experimenting with new recipes, having a clear conversion table makes things much easier.

Common Questions about Temperature Conversions

When it comes to temperature conversions, many people have questions. One common query is why we need different scales like Celsius and Fahrenheit in the first place. The answer lies in historical context and regional preferences. Different parts of the world adopted these systems based on various scientific developments.

Another frequently asked question is how to actually perform the conversion. For converting 16 Celsius to Fahrenheit, you can use the formula: multiply by 9/5 and then add 32. This makes it straightforward for anyone needing quick calculations.

Some wonder if there are any shortcuts or easier methods for everyday conversions. You can use online calculators or smartphone apps designed specifically for this purpose. These tools take away the math while providing instant results.

People also ask about freezing and boiling points of water across both scales. In Celsius, water freezes at 0 degrees and boils at 100 degrees; in Fahrenheit, those temperatures are marked at 32 degrees and 212 degrees respectively. Understanding these benchmarks helps contextualize temperature changes better.

A related question involves what temperature range feels comfortable indoors versus outdoors during different seasons. Generally speaking, a room around 20-22 Celsius (68-72 Fahrenheit) is considered ideal for comfort among most individuals.

Some might be curious whether body temperatures vary between these two scales as well! A normal human body temperature averages around 37 Celsius or approximately 98.6 Fahrenheit—providing another interesting point of reference when discussing everyday climates.

Additional Resources for Temperature Conversion

When it comes to converting temperatures, having reliable resources at your fingertips can make the process much easier. Numerous online tools are available that take the guesswork out of conversions. Websites like Calculator Soup or RapidTables provide simple calculators for quick conversions between Celsius and Fahrenheit.

Mobile apps are another excellent resource. Many temperature conversion apps allow you to convert units on the go, which is especially handy when traveling or working outdoors. Look for user-friendly options in app stores; many of them offer additional features like weather forecasts.

For a more hands-on approach, consider using charts and tables. A printed Celsius to Fahrenheit conversion table can be a great reference tool in kitchens or workshops where precise measurements matter. You can find downloadable versions online that you can print and keep handy.

If you’re interested in diving deeper into understanding temperature scales, educational websites often have detailed articles about the science behind these measurements. Sites like Khan Academy provide lessons that explain how different systems work and why they matter.

Don’t forget social media platforms! There are countless groups dedicated to mathematics and science where members share tips on conversions along with other useful information related to temperature measurement.

Remember books still hold value as resources too! Check your local library or bookstore for guides on scientific measurements—they often include sections on unit conversions that could enhance your knowledge further.

Improving Your Understanding of Temperature Conversion

Understanding temperature conversion is a valuable skill, especially when traveling or dealing with international recipes. Familiarizing yourself with the Celsius and Fahrenheit scales can significantly enhance your ability to communicate about weather forecasts, cooking temperatures, and even scientific discussions.

One of the best ways to improve your understanding is through practice. Try converting different temperatures regularly. For instance, take common references like freezing (0°C) or boiling (100°C) water and convert them into Fahrenheit. The more you work with these figures, the easier it becomes to visualize their relationships.

Utilizing online tools can also simplify this process. Numerous websites offer calculators that instantly convert between Celsius and Fahrenheit with just a click. This not only saves time but provides immediate feedback on your conversions.

Additionally, consider keeping a conversion chart handy in your kitchen or workspace for quick reference. A simple table listing key temperatures in both Celsius and Fahrenheit will serve as an excellent visual aid until you feel comfortable doing these calculations mentally.

Engaging in conversations about weather changes using both temperature scales can help reinforce what you’ve learned while making it applicable to everyday life situations. Whether you’re discussing travel plans or choosing clothing based on forecasted temperatures, integrating these conversions into daily conversations encourages retention of knowledge over time.

Temperature conversion doesn’t have to be intimidating; it’s simply another way we experience our world!

Continue Reading

Trending