
Education
DIY Paving with an Asphalt Calculator: Accurate Estimates

Are you planning a DIY paving project? Whether it’s a driveway, patio, or walkway, getting the measurements right is crucial. One of the most important tools in your arsenal should be an asphalt calculator. This nifty device can save you time and money by providing accurate estimates for materials needed.
Imagine starting your project with confidence, knowing exactly how much asphalt to order without any guesswork involved. No more wasting precious resources on over-purchasing or facing delays due to underestimating your needs. An asphalt calculator takes the stress out of calculations and ensures that your project runs smoothly from start to finish.
Ready to dive deeper into why every DIY paver should harness the power of this tool? Let’s explore what makes an asphalt calculator essential for achieving flawless results in any paving endeavor!
Understanding Asphalt Calculators
Asphalt calculators are handy tools designed to help you determine the amount of asphalt required for your paving project. They take various factors into account, making it easier to get accurate estimates without tedious manual calculations.
These calculators typically require input such as area dimensions and desired thickness. By entering this information, they can quickly compute how much material you’ll need. This way, you’re not left guessing or relying on outdated formulas that might lead to errors.
Most asphalt calculators will also allow you to specify different units of measurement—imperial or metric. This flexibility makes them user-friendly for anyone, regardless of their experience level in DIY projects.
In addition to calculating volume, some advanced models offer features like cost estimation based on local prices per ton. This added functionality helps keep your budget in check while ensuring that you’re well-prepared before heading out to purchase materials.
Many asphalt calculators are accessible online; just a quick search can bring up multiple options at your fingertips. There are even mobile apps available for those who prefer using smartphones or tablets when on-site.
Understanding how these tools work is the first step toward mastering any paving project. With an asphalt calculator by your side, you’ll find that planning becomes simpler and more precise than ever before.
Benefits of Using an Asphalt Calculator
Using an asphalt calculator can significantly enhance your DIY paving projects. One of the primary benefits is accuracy. When you input precise measurements, these calculators provide exact material estimates. This precision helps in minimizing waste and ensures that you purchase only what you need.
Cost savings are another major advantage. By calculating the exact amount of asphalt required, you can avoid overbuying materials. This not only saves money but also reduces unnecessary trips to suppliers for extra supplies.
Time efficiency is crucial in any project, and asphalt calculators help with that too. With just a few clicks or taps on your device, you can get quick calculations instead of spending hours figuring things out manually. This allows you to focus more on the actual work rather than getting bogged down by numbers.
Moreover, using these tools increases your confidence as a DIYer. Knowing you’re working from accurate data gives peace of mind that you’re making informed decisions throughout the paving process.
Asphalt calculators also offer flexibility for different project sizes and types—whether it’s a driveway, patio, or parking lot. You can easily adjust parameters like thickness and area dimensions based on specific needs without complicated formulas or math skills.
Many online asphalt calculators come with additional features such as cost estimators and tips for installation techniques. These resources further support your efforts while ensuring quality results in all aspects of your paving project.
How Asphalt Calculators Work
Asphalt calculators are powerful tools that simplify the estimation process for DIY projects involving asphalt. By inputting specific measurements, users can gain a clear understanding of how much material they will need to complete their project efficiently.
To use an asphalt calculator, you typically start by measuring the area where the asphalt will be laid. This often involves calculating length and width in feet to determine square footage. Some calculators may also allow for irregular shapes, enabling more accurate estimates based on precise dimensions.
Next, consider the desired thickness of your asphalt layer. Standard thicknesses vary depending on usage—driveways might require 2-3 inches while roads may need around 4-6 inches. The calculator uses these inputs to calculate volume requirements for your project.
The weight of asphalt is another vital factor integrated into calculators. Asphalt weighs about 145 pounds per cubic foot when compacted. When you enter both volume and weight specifications into the calculator, it provides an estimate of total weight needed for delivery.
Many modern online calculators even let users customize parameters such as compaction rates or waste factors, enhancing accuracy further still. These features help account for various conditions that could affect final results during installation.
Once all necessary data is entered, the calculator generates instant feedback outlining material quantities and potential costs involved in your project. With just a few clicks and entries, you’re well-equipped with knowledge that simplifies planning ahead effectively.
Choosing the Right Asphalt Calculator
Choosing the right asphalt calculator can significantly impact your project’s accuracy. With many options available, it’s essential to find one that fits your specific needs.
First, consider the type of project you’re tackling. Are you working on a driveway, parking lot, or road construction? Different calculators cater to different applications. Selecting one designed for your particular task ensures better estimates.
Next, think about user-friendliness. A good calculator should have an intuitive interface and straightforward instructions. If it takes too long to figure out how to use the tool effectively, it may not be worth your time.
Also look for features that match your requirements. Some calculators offer advanced functions like volume calculations based on thickness variations or area measurements in various units of measurement. Determine what functionalities are most important for your job.
Check reviews and feedback from other users when possible. Real-world experiences can provide insight into how well a calculator performs under various conditions and whether it’s reliable in delivering accurate results over time.
Consider accessibility and compatibility with other devices or software you might be using. Choosing a web-based option allows easy access across multiple devices while ensuring seamless integration with planning tools could enhance productivity throughout your project.
Tips for Accurate Estimates
Getting accurate estimates for your paver project is essential. Here are some tips to enhance the precision of your calculations.
First, measure carefully. Use a tape measure or laser measuring tool to gauge the length and width of the area you plan to pave. Even small errors can lead to significant discrepancies in material requirements.
Second, consider the depth of asphalt needed for your project. Different applications require various thicknesses, so knowing whether you’re paving a driveway versus a parking lot will influence your calculation.
Third, factor in waste and spillage. When ordering materials, it’s wise to add about 10% more than calculated to account for mistakes during installation or unexpected conditions that may arise.
Fourth, always verify local regulations regarding asphalt thickness requirements and specifications. This knowledge ensures compliance while also providing peace of mind that you’ve accounted for all necessary factors in your estimate.
Don’t hesitate to consult professionals if you’re unsure about any part of the process. They can offer insights into best practices tailored specifically for DIY enthusiasts like yourself.
With these tips at hand and an effective asphalt calculator by your side, you’ll be well-equipped to tackle any paver project with confidence and accuracy.

The term Inklings Assignment CSC refers to a common project or paper assigned within college-level Computer Science (CSC) courses, particularly those that incorporate interdisciplinary learning. The “Inklings” reference may nod to the famous Oxford writing group that included C.S. Lewis and J.R.R. Tolkien, suggesting a blend of analytical and creative writing applied to technology, ethics, or literature in computing.
This assignment typically challenges students to explore a topic related to computer science through a reflective, research-based, or literary lens.
Purpose Behind the Inklings Assignment CSC
The primary aim of the Inklings Assignment CSC is to:
- Develop critical thinking and writing skills in technical students
- Encourage interdisciplinary exploration combining technology and humanities
- Foster ethical reasoning around computing applications
- Sharpen research and argumentation abilities
It pushes students out of purely algorithmic or programming tasks and into thoughtful discourse, connecting coding to culture, communication, and cognition.
Understanding the Course Context (CSC)
CSC, or Computer Science coursework, typically includes theoretical and practical modules:
- Programming (e.g., Python, Java, C++)
- Data Structures and Algorithms
- Computer Architecture
- Software Engineering
- Artificial Intelligence
- Cybersecurity
The Inklings assignment might appear in electives such as:
- Ethics in Computing
- Human-Computer Interaction
- Philosophy of Technology
- Digital Humanities
These contexts help shape the assignment’s tone, style, and expected outcomes.
Common Themes in Inklings Assignment CSC
Students may be asked to explore:
- The ethical implications of AI or automation
- Comparing machine intelligence to human creativity
- Digital privacy and surveillance
- Gender and diversity in tech fields
- Literary metaphors for digital systems
Long-tail variations of the keyword like “how to write an inklings assignment for CSC” or “CSC ethics writing task explained” are relevant for real-world searchers looking for help.
How to Approach the Inklings Assignment CSC
Step-by-step guidance:
- Clarify the Prompt: What exactly is being asked? Break down keywords.
- Identify Relevant Sources: Books, scholarly articles, ethical frameworks.
- Develop a Thesis Statement: A clear, arguable claim.
- Create an Outline: Plan your intro, body, and conclusion.
- Write and Revise: Start early, revise often.
Don’t be afraid to incorporate your own perspective—many instructors value reflective insight just as much as research.
Structuring Your Assignment Effectively
While structure may vary slightly by instructor, here’s a widely accepted format:
1. Introduction
- Hook or relevant anecdote
- Background on the topic
- Thesis statement
2. Body Paragraphs
- Topic sentences leading each section
- Evidence and analysis
- Quotes, statistics, real-world examples
- Clear transitions
3. Counterarguments (if applicable)
- Present opposing views fairly
- Refute or reconcile with your stance
4. Conclusion
- Summarize key points
- Restate thesis
- Call to thought or action
Research Strategies for Success
Using trusted academic and industry sources is key. Consider:
- ACM Digital Library
- IEEE Xplore
- Google Scholar
- Books on tech ethics and digital philosophy
- Interviews with technologists and thinkers
Tools You Can Use:
- Zotero or Mendeley for citation management
- Grammarly or Hemingway for editing
- Purdue OWL for writing guides
Always cite your sources in the style requested (APA, MLA, Chicago, etc.)
Avoiding Common Mistakes
Avoid these pitfalls that students often fall into:
- Overgeneralizing: Avoid vague statements or unsupported opinions.
- Skipping the Prompt: Misinterpreting the question can derail your entire paper.
- Flawed Structure: A strong intro and clear flow are essential.
- Lack of Citation: Plagiarism, even unintentional, carries academic penalties.
- Too Much Jargon: Write accessibly for both technical and non-technical audiences.
Examples of Successful Inklings Assignments
Example 1: “AI and the Ethics of Prediction”
- Thesis: Predictive policing software undermines due process and reflects societal bias.
- Sources: Peer-reviewed studies, media analysis, legal commentary
- Outcome: A grade of A and featured on the university website
Example 2: “The Programmer as a Modern-Day Author”
- Analogy comparing software engineers to literary creators
- Cited works from Tolkien and Alan Turing
- Used metaphor effectively to discuss software architecture
These examples show the power of integrating creative thought with rigorous analysis.
Conclusion and Final Advice
The Inklings Assignment CSC offers students a valuable opportunity to go beyond coding and algorithms. It challenges you to think about how technology intersects with society, philosophy, literature, and ethics.
Approach the assignment not just as a grade, but as a chance to reflect, reason, and refine your worldview as a computer scientist. Plan early, think deeply, and write clearly.
FAQs on Inklings Assignment CSC
1. What is the goal of the Inklings Assignment CSC?
To combine technical knowledge with analytical, ethical, or philosophical thinking.
2. How long should the assignment be?
Typically 1,500 to 2,000 words, but always check the course guidelines.
3. Can I use first-person voice?
If the prompt allows for reflection, yes. Otherwise, maintain an academic tone.
4. Is programming required in this assignment?
Usually no. This is a written task, though programming examples may support your argument.
5. What if I’m not a strong writer?
Use writing centers, online tools, or peer review to strengthen your draft.
Call to Action:
If you’re currently working on an Inklings Assignment CSC, bookmark this guide, share it with classmates, and start outlining your response today. Your best work comes when thought meets intention!

“The Cruel Prince,” written by Holly Black, is a stunning entry into the world of young adult fantasy literature. The novel masterfully blends dark themes, intricate world-building, and complex character arcs, making it an unforgettable journey into the realm of Faerie. As the first book in “The Folk of the Air” series, “The Cruel Prince” sets the stage for a tale filled with intrigue, power struggles, and the pursuit of identity.
Synopsis of “The Cruel Prince”
“The Cruel Prince” follows the story of Jude Duarte, a mortal girl thrust into the world of Faerie after her parents are murdered by Madoc, a faerie general. Alongside her twin sister Taryn and their half-sister Vivienne, Jude grows up in the High Court of Faerie. Despite being human, Jude yearns for power and acceptance in a world that dismisses her as inferior. Her journey intertwines with the dark and enigmatic Prince Cardan, leading to a series of alliances, betrayals, and revelations that challenge everything she knows.
READ MORE:The://vital-mag.net Blog: Technology and Lifestyle Insights
Themes in “The Cruel Prince”
- Power and Ambition:
- Jude’s relentless pursuit of power forms the backbone of “The Cruel Prince.” Her ambition drives her to navigate the perilous politics of Faerie, making morally ambiguous choices along the way.
- Identity and Belonging:
- As a mortal in the Faerie world, Jude grapples with her identity and her desire to belong. The novel explores the tension between embracing one’s humanity and striving to fit into an alien world.
- Deception and Betrayal:
- Faerie is a realm rife with deceit. Jude learns to manipulate and outwit her adversaries, often questioning her own morality in the process.
- Love and Hatred:
- The intricate dynamics between Jude and Prince Cardan add a layer of emotional complexity. Their relationship oscillates between animosity and a deep, unspoken connection.
- READ MORE:Kim’s Lost Words: Explore Emotions and Unspoken Connections
Character Analysis
Jude Duarte:
Jude is a fiercely determined protagonist. Her transformation from a vulnerable mortal to a cunning player in Faerie politics is both inspiring and unsettling.
Prince Cardan:
Cardan’s initial portrayal as cruel and indifferent gradually reveals a character shaped by trauma and hidden depth. His arc in it sets the stage for future developments in the series.
Madoc:
As Jude’s adoptive father and the murderer of her parents, Madoc is a paradoxical figure. His actions are both ruthless and protective, reflecting the complex morality of Faerie.
READ MORE:“Go Piss Girl” Meme: Origins, Popularity, and Impact
World-Building in “The Cruel Prince”
Holly Black excels at creating an immersive world. The Faerie realm in novel is a place of beauty and danger, filled with intricate details that bring it to life:
- Courts and Hierarchies: The political structure of Faerie is elaborately depicted, showcasing the power struggles and alliances that drive the story.
- Magic and Mythology: Enchantments, magical creatures, and ancient traditions form the fabric of the world, adding depth and authenticity.
- Human-Faerie Dynamics: The contrast between mortal fragility and faerie immortality is a recurring theme, highlighting the precarious position of humans in this realm.
Reception of “The Cruel Prince”
“The Cruel Prince” has been widely praised for its compelling narrative and nuanced characters:
- Critical Acclaim: Reviewers have lauded Holly Black’s ability to subvert traditional fantasy tropes, creating a story that is both fresh and engaging.
- Fan Appreciation: The book’s exploration of morally gray characters and its gripping plot have resonated with readers, earning it a dedicated fanbase.
Key Moments in “The Cruel Prince”
- Madoc’s Betrayal: The opening scene where Madoc murders Jude’s parents sets the tone for the novel’s dark themes.
- Jude’s Oath: Jude’s decision to serve as a spy in the Faerie court marks a turning point in her quest for power.
- The Coronation: The chaotic events during the coronation ceremony reveal hidden alliances and foreshadow future conflicts.
Why “The Cruel Prince” Stands Out
Complex Characters:
Each character in “The Cruel Prince” is deeply flawed and multifaceted, making them relatable and intriguing.
Moral Ambiguity:
The novel challenges traditional notions of good and evil, presenting a world where survival often necessitates compromise.
Rich Prose:
Holly Black’s writing style is lyrical and evocative, capturing the ethereal beauty and peril of the Faerie world.
FAQs About “The Cruel Prince”
- What genre is “The Cruel Prince”? “The Cruel Prince” is a young adult fantasy novel.
- Is “The Cruel Prince” part of a series? Yes, it is the first book in “The Folk of the Air” trilogy.
- Who are the main characters? The main characters include Jude Duarte, Prince Cardan, Madoc, Taryn Duarte, and Vivienne.
- What age group is “The Cruel Prince” suitable for? It is targeted at young adult readers but contains mature themes suitable for older audiences.
- What are the sequels to “The Cruel Prince”? The sequels are “The Wicked King” and “The Queen of Nothing.”
- Has “The Cruel Prince” been adapted into a movie or TV series? As of now, there is no official adaptation, though fans eagerly await one.
Converting temperatures can sometimes feel like a daunting task, especially when you’re trying to figure out how hot it really is outside. Whether you’re planning a beach day or checking the weather for your next hike, understanding temperature conversions is essential. If you’ve ever wondered what 29 Celsius to Fahrenheit, you’re not alone!
This guide will help you easily navigate the Celsius and Fahrenheit scales so that you’ll never be caught off guard by temperature differences again. We’ll break down everything from basic definitions to conversion methods and even provide handy resources for quick reference. Let’s dive in and demystify this common conversion together!
Celsius and Fahrenheit Explained
Celsius and Fahrenheit are two of the most commonly used temperature scales around the world. Each has its own unique history, origin, and application. Understanding these differences can make it easier to navigate weather reports or cooking instructions.
The Celsius scale is widely adopted in most countries. It’s based on the freezing point of water at 0 degrees and boiling point at 100 degrees under standard atmospheric conditions. This makes it intuitive for everyday use, especially when discussing weather.
Fahrenheit, on the other hand, is primarily used in the United States and a few Caribbean nations. The scale defines the freezing point of water as 32 degrees and its boiling point as 212 degrees. This means that Fahrenheit temperatures seem less straightforward compared to Celsius.
One key difference lies in their increments; each degree on the Celsius scale represents a larger change in temperature than one degree on the Fahrenheit scale. This can lead to some confusion if you’re accustomed to only one measurement system.
Despite these differences, both scales serve their purposes well within their respective regions. Weather forecasts typically utilize Celsius outside North America while many Americans rely heavily on Fahrenheit for daily life.
Being aware of both systems enables better communication about temperature across different cultures or disciplines like science and cooking where precision matters greatly!
Conversion Formula and Calculator
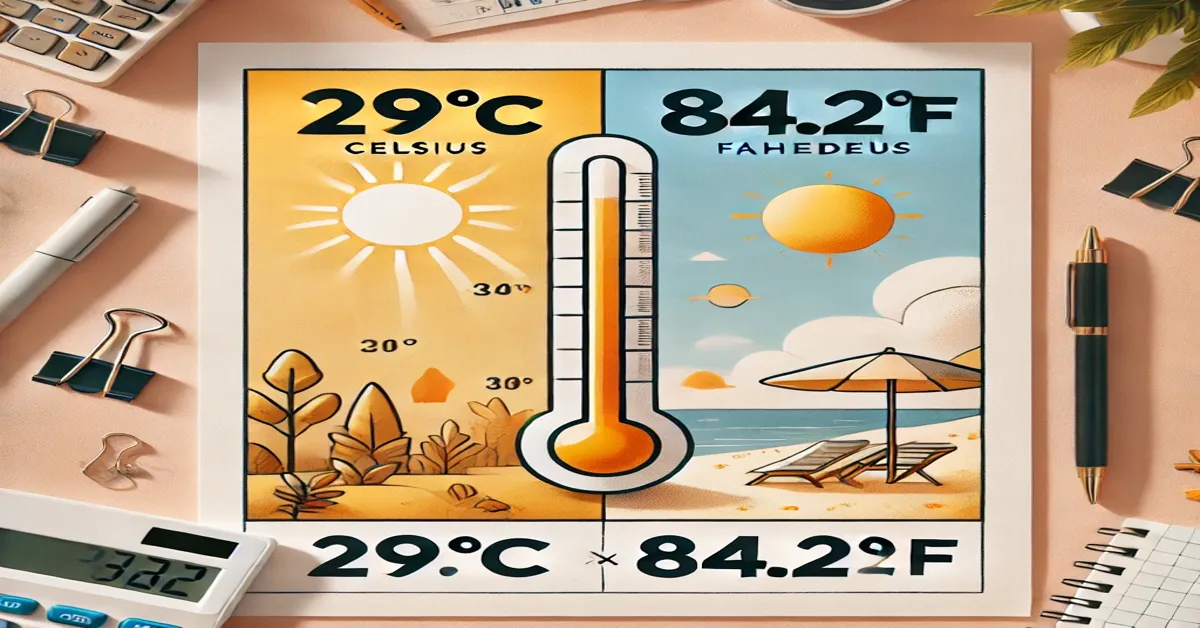
To convert 29 Celsius to Fahrenheit, you can use a simple formula. This is essential for anyone needing quick temperature conversions. The formula goes like this: multiply the Celsius temperature by 1.8 and then add 32.
So, if you want to convert 29 degrees Celsius to Fahrenheit, start with multiplying it by 1.8. That gives you about 52.2 when calculated precisely. Next, take that result and add 32 to it.
The math looks like this:
(29 * 1.8) + 32 = ?
This leads us directly to your answer of approximately 84.2 degrees Fahrenheit.
If you’re not comfortable with manual calculations or prefer convenience, there are many online calculators available for instant results. You simply enter the Celsius value, click a button, and voilà! It displays the equivalent in Fahrenheit instantly.
Mobile apps also provide handy conversion tools right at your fingertips—ideal whether you’re cooking or traveling abroad where different measurement systems are used.
These options make converting temperatures easier than ever before! Whether you’re using formulas or digital tools, getting from Celsius to Fahrenheit has never been simpler.
How to Convert 29 Celsius to Fahrenheit
Converting 29 Celsius to Fahrenheit is a straightforward process once you understand the formula. The mathematical relationship between these two temperature scales can be boiled down into a simple equation: F = (C × 9/5) + 32.
To begin, take your Celsius value—in this case, it’s 29 degrees. Start by multiplying this number by 9/5 or simply 1.8. This calculation gives you the first part of the conversion.
Next, multiply:
29 × 1.8 = 52.2
Now, you have your result ready for the next step in the formula.
The final stage involves adding 32 to that product from before.
So, proceed with:
52.2 + 32 = 84.2
This means that when converting from 29 Celsius to Fahrenheit using our example of 29 Celsius to Fahrenheit, you’ll arrive at an equivalent temperature of about 84.2 degrees Fahrenheit.
If math isn’t your strong suit or if you’re looking for quicker solutions, there are many online calculators available as well! Simply input “29 C” into any reliable temperature conversion tool and get instant results without doing any calculations yourself.
Using accurate conversions is essential whether you’re cooking recipes or planning travel based on weather forecasts where temperatures vary across regions worldwide.
Celsius to Fahrenheit Conversion Table
When it comes to temperature conversions, having a quick reference can be incredibly useful. A Celsius to Fahrenheit conversion table provides an easy way to look up various temperatures without needing to do the math each time.
For instance, knowing that 0 degrees Celsius equals 32 degrees Fahrenheit is fundamental for anyone working with international weather data or cooking recipes from different countries. You might also find it handy when planning outdoor activities based on temperature.
As you go up the scale, things become more interesting. At 20 degrees Celsius, you’re looking at about 68 degrees Fahrenheit—perfect for a pleasant spring day in many regions. This kind of information helps people decide what to wear or how to prepare their homes for seasonal changes.
At 29 Celsius to Fahrenheit specifically, you’ll find yourself at around 84.2 degrees Fahrenheit—a warm temperature ideal for beach outings and barbecues. It’s important not only for those living in warmer climates but also travelers who need to pack accordingly.
Conversely, if you’re dealing with colder numbers like -10 degrees Celsius, that translates roughly into 14 degrees Fahrenheit. Such details are crucial during winter months when preparing your home or vehicle against freezing conditions.
A well-organized table makes these comparisons straightforward and eliminates guesswork from daily life decisions related to weather and comfort levels.
Additional Resources
When it comes to understanding temperature conversions, having the right resources can be incredibly helpful. Whether you’re a student, a professional in science or cooking, or simply curious about how Celsius and Fahrenheit relate to each other, there are plenty of tools at your disposal.
For those wanting quick calculations without manual work, numerous online calculators allow you to convert any Celsius value into Fahrenheit within seconds. Websites like UnitConverter.net and RapidTables.com offer user-friendly interfaces that make conversion simple and efficient.
If you’re interested in learning more about temperature scales beyond just basic conversions, consider exploring educational resources such as Khan Academy or Coursera. They provide engaging lessons on thermodynamics and measurement systems that deepen your understanding of these concepts.
Additionally, mobile apps dedicated to unit conversions can be extremely useful when you’re on the go. Apps like “Convert Units” or “Units Plus” not only assist with temperature but also cover various units including length, weight, volume, and more.
For anyone who enjoys DIY projects or culinary adventures in the kitchen where precision is key—having access to reliable conversion charts will enhance your experience significantly. Various printable templates are available online for quick reference without needing internet access.
With these resources at your fingertips, converting 29 Celsius to Fahrenheit—and any other measurements—becomes an effortless task!
READ MORE:Convert 50 F to C: Simple Conversion Guide and Practical Tips

 News3 months ago
Linda de Sousa Abreu: Lessons from HMP Wandsworth Case
- Uncategorized2 months ago
Master Spelling Bee Words: Top Lists & Winning Strategies
- Lifestyle4 months ago
Transform Your Photos with CumonPrintedPics Printing Service
- Entertainment2 months ago
The Hobbit Cast: Full List of Actors & Their Roles
- Entertainment3 weeks ago
Skibidi Toilet Movie – Journey from Web Series to Big Screen
- Entertainment4 months ago
Iconic MF DOOM Mask: Symbol of Mystery and Hip-Hop Legacy
- Entertainment4 months ago
The Evolution of Monkey Memes: Viral Hits to Cultural Icons
- General5 months ago
IOFBodies.com Applications: Streamlining Body Donation